

A price list has one job: help a buyer find a product and its price in a few seconds. It doesn’t need lifestyle photos or a story. It needs tidy rows of products, the right price, and figures your customers can trust.
If you sell on Shopify, the data is already there: titles, SKUs, variants and prices. This guide shows how to turn it into a compact price list PDF in the EasyCatalog grid editor, and how to keep it current when your prices change.
The short version
- Click Add products and use Bulk add to bring in whole collections, in the currency you need.
- In Page & Grid, add columns and rows so more products fit on each page.
- In Product fields, show only the title, SKU and price (plus anything buyers really need).
- In Theme › Prices, set the currency symbol, number format and decimals once.
- Use Discount & Tax for wholesale or ex-tax prices.
- Before each new PDF, click Sync to pull the latest prices from Shopify.
What a good price list needs
A catalog or a lookbook sells the look of a range. A price list answers one question: what does it cost? Whatever you sell, a useful one has the same qualities:
- Easy to scan. Many products per page, with the same layout on every page.
- Only the details that matter. Usually the name, the SKU or product code, the price, and sometimes the size, color or pack.
- One clear price. Buyers should know if it’s a wholesale price, a recommended retail price, or a price before tax.
- One currency and one number format across the whole document.
- Up to date. A list with last season’s prices costs you either margin or trust.
Add your Shopify products
On your Catalogs page, click New catalog (Advanced editor). Pick Blank catalog for product pages only, or a design kit for a cover too. In the Start with a template window, name the catalog and choose the paper size (A4, Letter or A5) and orientation. The editor can’t change the paper size later.
In the editor, click Add products, the blue button in the top bar right after Undo and Redo. The window has two tabs.
Bulk add is the fast way to build a price list. Pick one or more collections, or B2B catalogs, and all of their products are added at once. Each one becomes its own section on new pages, named after the collection, so your list is grouped by category without extra work. The options on the right help you shape the list:
- Filters by status, vendor, product type, tag or price. For a list of what you sell today, set Product status to Active only.
- Sort products by, for example Title A–Z or Price low–high.
- Variant display: First variant only gives one card per product. Each variant as a separate product gives every size or color its own card, with its own price and SKU. Choose this when variants are priced differently.
Individual products is for hand-picking. Search your store, or click Add filter + to narrow the list by collection, status, product type, tag, vendor or category. Tick the products you want and click Add.
Choose the currency when you import
If your store sells in more than one currency through Shopify Markets, Bulk add shows a Currency option. Prices are imported with your Markets pricing for that currency, and the catalog shows its symbol. A catalog uses one currency, so for a euro list and a dollar list, build one catalog for each.
No Markets currency for the market you need? You can convert prices yourself: type an exchange rate in Multiply price by in Discount & Tax, then pick the matching symbol in Theme › Prices. Only the Discount price field is converted, so show that price alone and turn off the compare-at strikethrough, which would still print the unconverted figure.
Not on Shopify? In an EasyCatalog account without a store, Bulk add lets you add all of your inventory at once or import a file. Our guide to turning a spreadsheet into a catalog walks through it.
Set up a compact grid
Price lists work best when many products fit on a page. Click Page & Grid in the left sidebar and set Apply changes to to Whole catalog first, so every product page follows.
- Columns (1 to 10) and Rows (1 to 12) decide how many products fit. Four columns and five rows give you 20 products a page, a good start for a list with small photos. Products that no longer fit move onto the next pages, so nothing is lost.
- Page margins and the Gap between products slider control the white space. Product pages from new templates start with 20 px margins and a 6 px gap between products, which already suits a dense layout.
- Row height: Fill the page stretches the rows to fill the page. Fixed row height gives every row the height you type, so the rows stay compact.
For a text-first list, click a product on the page to open Card style and lower the Image / details split, so the details get more room. For no photos at all, click Image in Product fields to hide it.
Removed a few products? Click Reflow in the top bar. It moves products forward, page by page, to fill the empty spots.
Each section’s header shows its collection name, so your categories get headings with no extra work. Click a header to add a Subheader text such as “Prices valid from 1 January”. More in the Page & Grid guide.
Choose the fields to show
Open Product fields and set Apply changes to to Whole catalog (it starts on This collection). Click a field to show or hide it, and drag the handle to change the order. New catalogs show Image, Title, SKU and Discount price.
Three field sets cover most price lists:
Retail price list
Title, SKU and Discount price. Add Vendor if you sell several brands.
Wholesale line sheet
Title, Variant title or Options, SKU, Barcode, plus Price and Discount price, each with a label.
List for sales reps
Title, SKU, Discount price and Total qty or Variant qty, so reps can see stock at a glance.
- Discount price shows your normal price until a discount applies, so it suits most lists. Price is the store price as imported.
- Unit cost is your cost per item. Keep it off in anything customers see.
- Variant table (Shopify stores) adds a table of sizes or colors to each card, with columns such as Variant, SKU, Price and Qty. It needs room, and it shows Shopify’s variant prices, not discounted ones. For a discounted wholesale list, import with Each variant as a separate product instead.
To put the list in order, open Products in the left sidebar and use Sort by…: Title, SKU, Price, Stock, Vendor, Product type or Date created. Many trade buyers look products up by SKU, so SKU order is often the most useful. See Choose the fields in the guide for the full list.
Format prices in Theme › Prices
The quickest way to format every price is the Theme pane. Click Theme in the left sidebar and open the Prices tab. Each setting applies to every price, compare-at, discount and cost field in the catalog at once, and a preview at the top shows the result.
| Setting | Options |
|---|---|
| Currency symbol | Your store default, or another symbol |
| Symbol position | Before the price, after the price, or hidden |
| Number format | 1234.56 · 1,234.56 · 1.234,56 · 1 234,56 · 1’234.56 |
| Decimals | Cents (12.50) or rounded (13) |
Two things to keep in mind:
- The symbol doesn’t convert prices. Changing it only changes how prices look. To list prices in another currency, choose it when you import (see above).
- Rounded means rounded. A price of 129.95 prints as 130. That reads well on a retail list, but on a trade list buyers will compare against your invoices, so cents are usually safer.
For labels, click a price on a card. Its settings include Text before and Text after, for example “RRP”, “ex VAT” or “/ case”, and the Show compare-at price (strikethrough) tick. Each price field has its own labels. The price format guide covers the rest, including showing the price as a badge on the photo.
The other two Theme tabs set the type and palette. In Fonts, headings and product names take the first font of a pair. In Colors, the Neutral filter finds quiet palettes that suit a dense list.
Wholesale prices, tax and compare-at prices
Your price list doesn’t have to show your store prices. Open Discount & Tax in the left sidebar:
- Choose the Discount type (a percentage or a fixed amount) and the Discount.
- Add Remove tax (%) to print prices before tax, or a number in Multiply price by for an exchange rate or a markup.
- Check the preview for the product picked under Select product.
- Click an Apply to button: Selected product, This page, This collection or Whole catalog. Nothing changes until you do.
The steps run in that order: the discount first, then the tax comes off (the price is divided by 1.2 for 20% tax), then the multiplier. With 20% tax, a £120 product prints at £100 ex VAT. Add a 20% discount and it prints at £80. To give collections different discounts, apply to This collection on each one.
The result prints in the Discount price field, while Price keeps the store price. To show both, tick both fields and label them with Text before, for example “RRP” and “Wholesale”.
Compare-at prices need a decision. By default, Discount price prints a higher compare-at price struck through next to it. That suits a sale flyer. On a wholesale list it can confuse buyers, so click a price and untick Show compare-at price (strikethrough). If you want to show the compare-at price as a plain figure, tick Compare price and untick its Strikethrough.
Keep wholesale prices in a Shopify metafield? Pick it in the Metafield menu of Discount & Tax. Need one product at its own price? Click Data next to Design in the top bar and type it in the Discount price column.
None of this changes your Shopify prices. The Discount & Tax guide explains which price wins when several apply.
Keep it up to date with Sync
A price list goes out of date the moment you reprice in Shopify, and the catalog doesn’t update by itself. So make a refresh part of your routine before each send: click Sync in the top bar (Shopify stores). Its menu has two options.
Update product data refreshes the products already in the catalog. Tick the fields to refresh: for a price list, at least Price and Compare-at price. Fields you edited by hand in the catalog are always kept, and discounts from Discount & Tax are worked out again from the new prices. The optional Remove out-of-stock products (inventory 0) tick takes sold-out products off the pages.
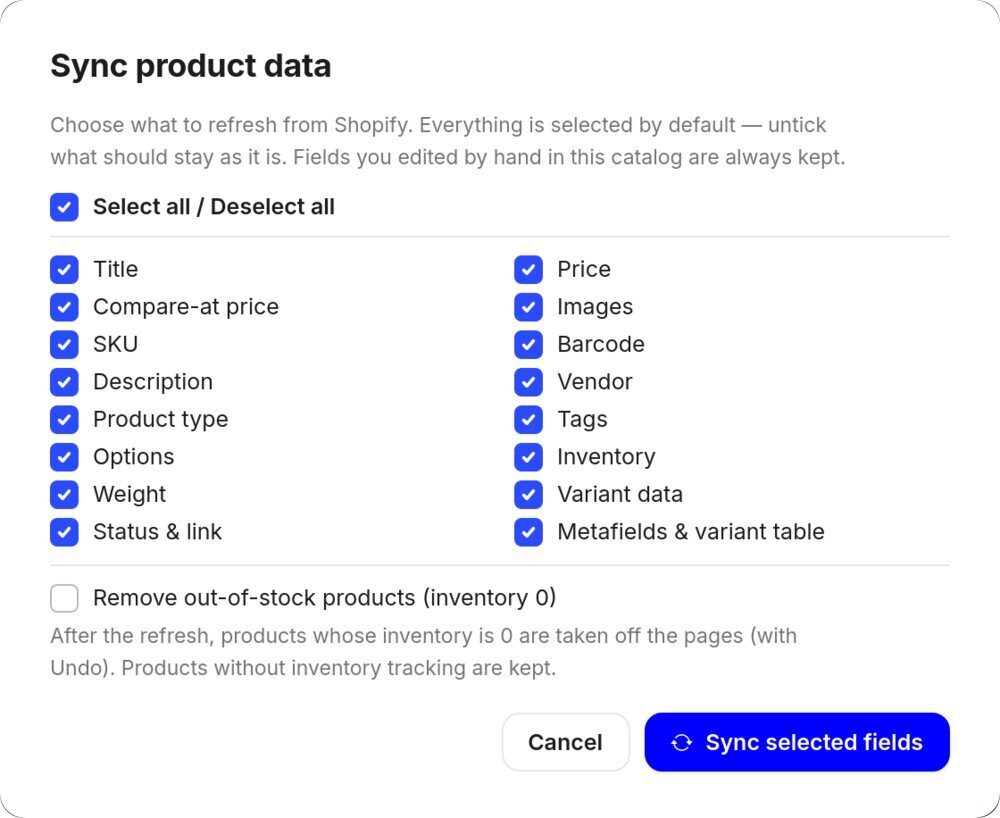
Reimport collections is for when your range has changed. Each collection is fetched again from Shopify and its pages are updated in place: new products are added, and products no longer in the collection are removed. Page layouts, styles and your product edits are kept.
Imported each variant as a separate product? Update product data keeps each variant card’s imported price, so use Reimport collections to pick up new variant prices. Then click Save and generate the PDF again: the PDF is a snapshot.
Generate and share the PDF
Click Generate PDF catalog. Check the name, which shows on your Catalogs page and on the pages you share. Tip: put the season or month in it, like “Wholesale price list, spring”. Then pick a print quality. Standard (150 DPI) is right for email and links. Use High quality (300 DPI) if you’ll print it.
When the PDF is ready, its card on the Catalogs page gives you share links: the PDF, a Wholesale flipbook with an order form, a browse-only Showcase flipbook, and on Shopify a Retail flipbook that checks out in your store. When you generate an updated list later, the links stay the same.
One setting matters for price lists. By default, the Wholesale order form uses your live store prices. If your list prints discounted wholesale prices and buyers should pay those, open Wholesale rules on the catalog card and set Price mode to Catalog discount.
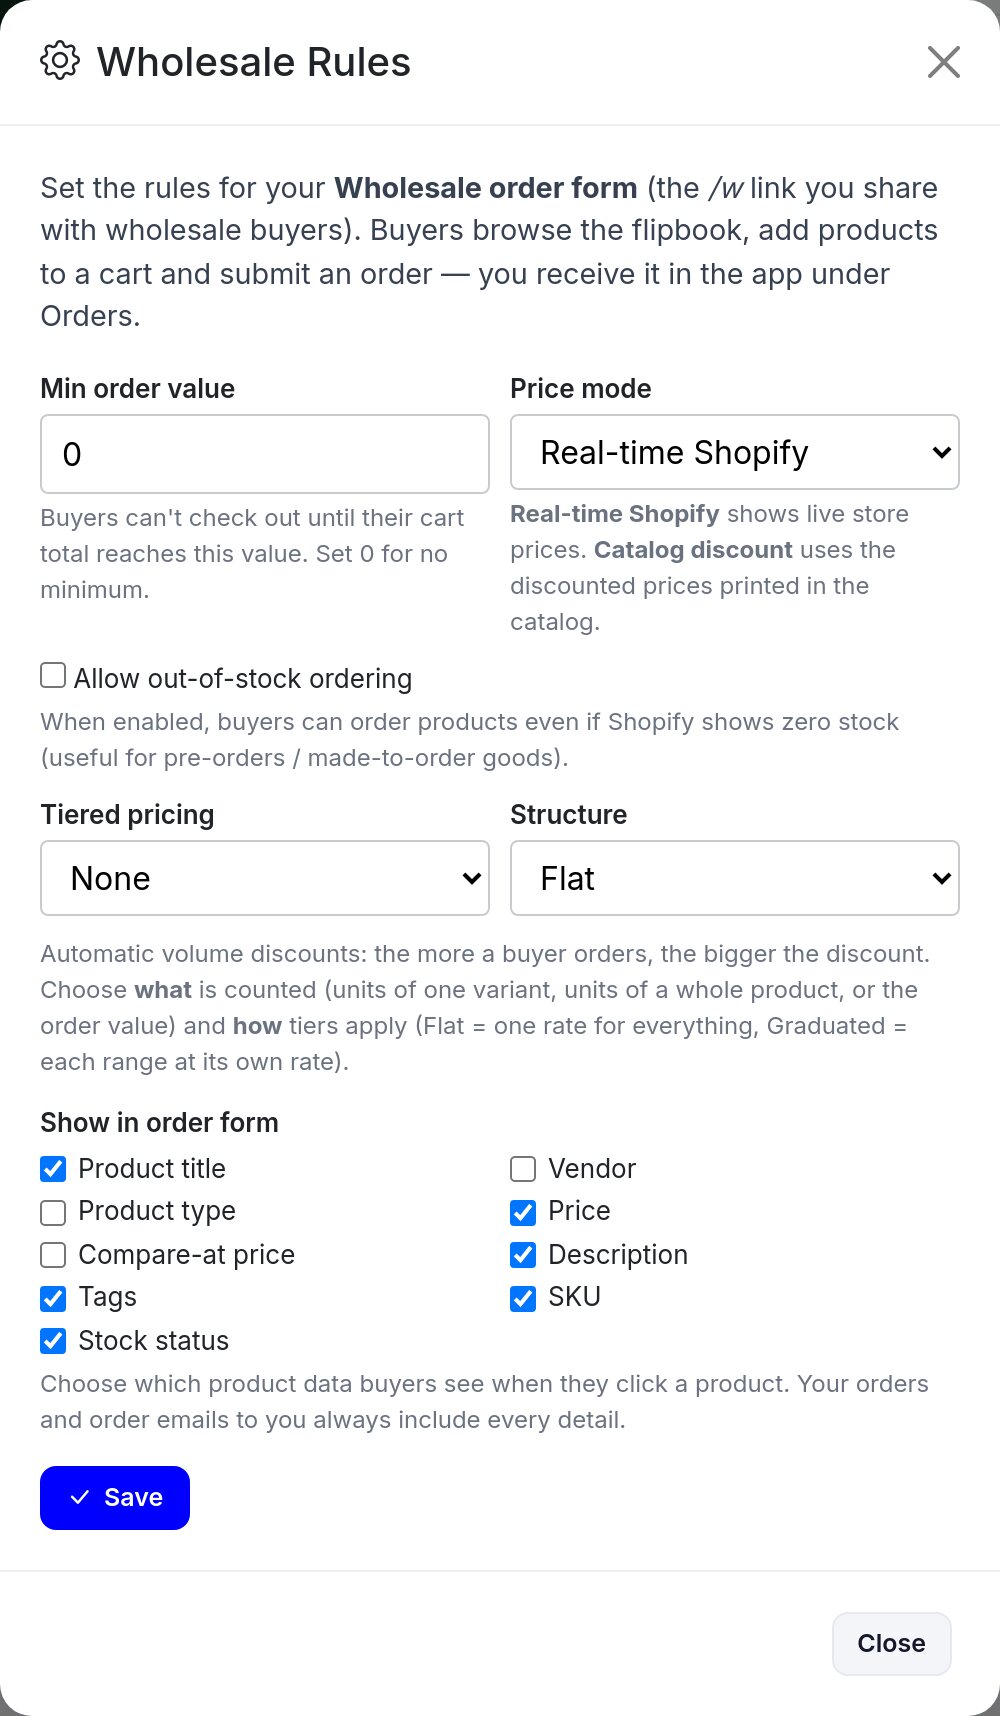
Taking orders from the list? Read how to build a wholesale order form that converts and wholesale catalogs for Shopify.
Stuck on a step? Click Need help? in the bar under the page to ask Fin, the AI assistant. Ask in your own words, and Fin answers with the buttons to click. For every panel in detail, open the grid editor guide.
Make your price list
Add your products, set the price format once and generate a PDF your buyers can use today.