The grid editor (the New catalog (Advanced editor) button on your Catalogs page) turns your products into a print-ready PDF catalog, laid out on a grid. It now has a new workspace. If you have used Canva, it will feel familiar: your tools in the left sidebar, one secondary panel at a time, the canvas in the middle and the Pages sidebar on the right.
If you have used the grid editor before, every tool is still here. The tools are easier to find, and the canvas gets more room. Here is what changed:
- One tool at a time. Pick a tool in the left sidebar and its options open in the secondary panel. Close the panel to give the canvas more room.
- Pages on the right. Every page is a thumbnail in the Pages sidebar, with a book view that shows how facing pages pair up in print.
- Click it to style it. Click a product, a price or a heading on the page, and its settings open.
- Version history. Every save keeps a version you can go back to.
- A spreadsheet Data view. Edit titles, SKUs and prices in rows and columns.
- Undo across the whole catalog. Undo and Redo cover every page, not just the one in front of you.
Want every button explained? This post is the quick tour. The full grid editor guide covers each panel and setting in detail.
Find Your Way Around
To show every step, we built one catalog from start to finish: Spring Collection 2026, for a sample shop called Stride & Co. It has 8 pages and 25 products from three collections. Every screenshot below comes from that build.
The screen has six areas. Once you know them, everything else falls into place.
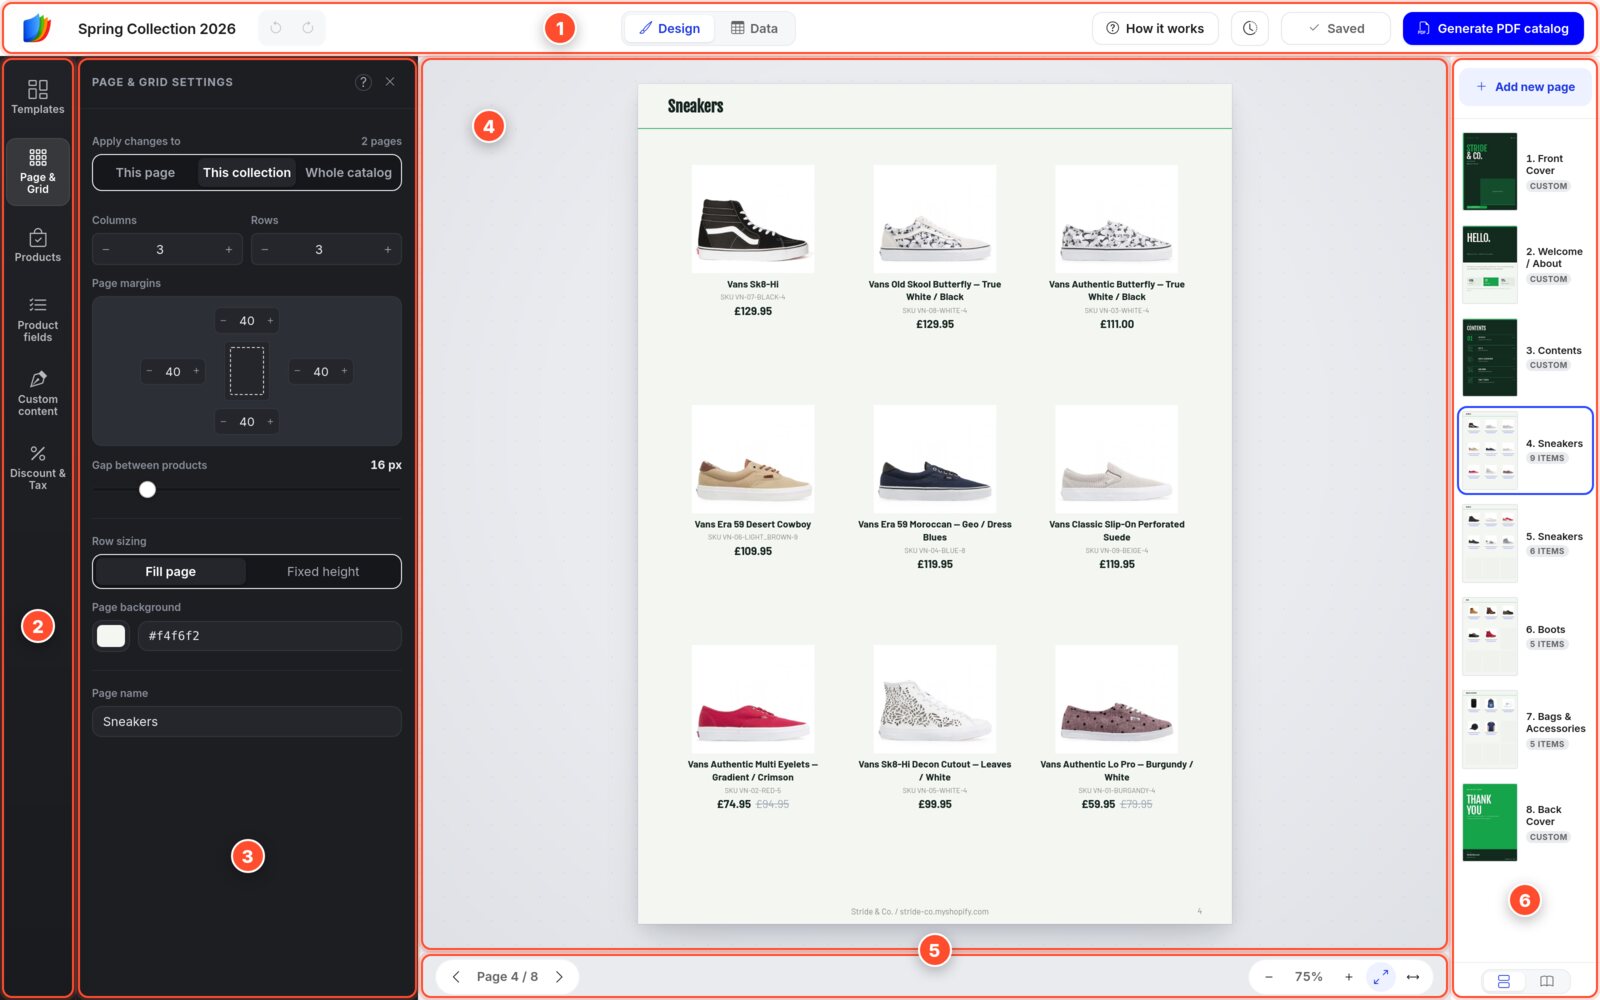
- Top bar. The logo takes you back to the Templates page. Next to it: the catalog name (click to rename; it is also the PDF file name), Undo and Redo, the Design | Data switch, How it works (reopens the quick guide), the clock for version history, the Save button and Generate PDF catalog. The Save button reads Saved, or Unsaved in amber when you have changes.
- Left sidebar. Your tools: Templates, Page & Grid, Products, Product fields, Custom content and Discount & Tax. While something is selected, one more item appears at the bottom: Styling for a product, or Text, Image and so on for an element on a design page.
- Secondary panel. The options of the tool you picked. It is dark while you use a tool, and turns white when it shows the settings of something you clicked on the page. The X slides it away. Click any icon, or anything on the page, to bring it back.
- Canvas. The page exactly as it will print. Click anything on it to edit it. Click an empty + cell to choose where the next product goes. Drag products between cells.
- Page & zoom bar. Move between pages, zoom in and out, or fit the page to the screen.
- Pages sidebar. The right sidebar. Click a page to open it, drag to reorder, hover to duplicate or delete. Add new page opens the page templates. The two buttons at the bottom switch between a list and a book view.
In short: choose what to work on in the left sidebar, change it in the secondary panel, see the result on the canvas, and organize the whole catalog in the Pages sidebar.
Your catalog has two kinds of pages. Product pages hold a grid of products, and the Pages sidebar shows how many (for example 9 ITEMS). Design pages, such as the cover, the welcome page and the contents, are free-form. The Pages sidebar marks them CUSTOM.
Not sure what a setting does? Hover the small ? next to a section title.
Step 1 Start from a Template
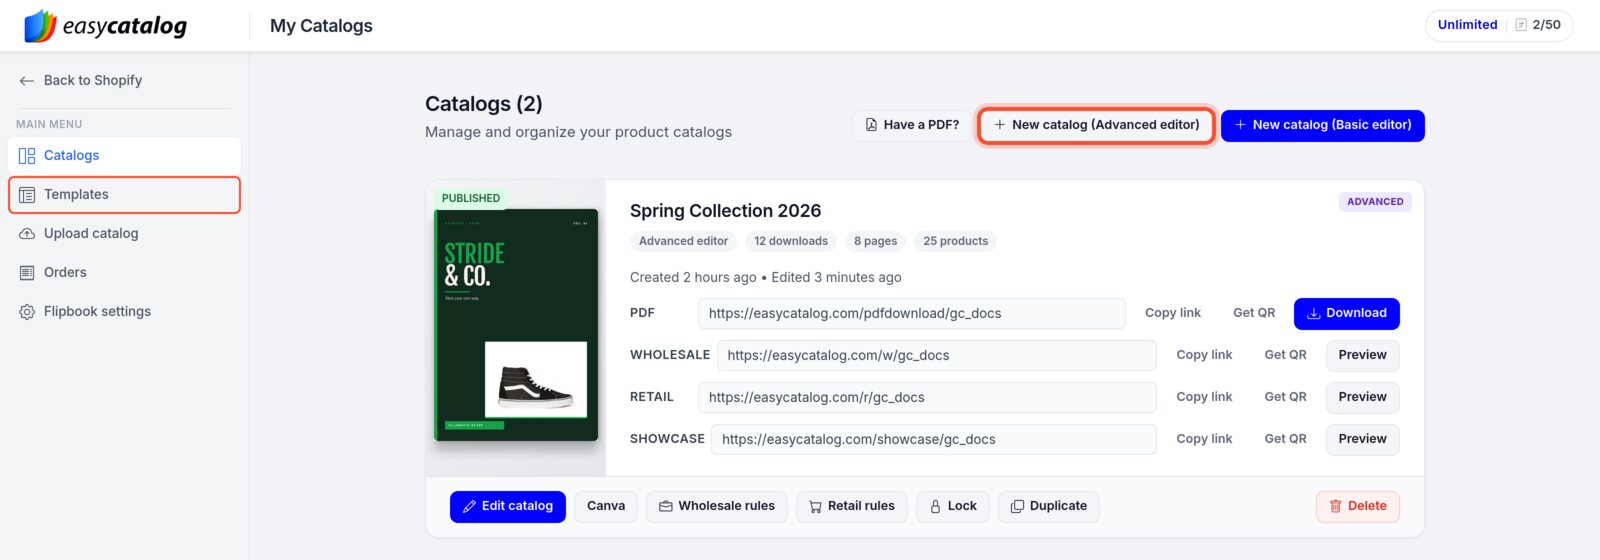
On your Catalogs page, click New catalog (Advanced editor). It is the white button next to the blue New catalog (Basic editor). You can also click Templates in the main menu. Without a Shopify store, the button is just New catalog.
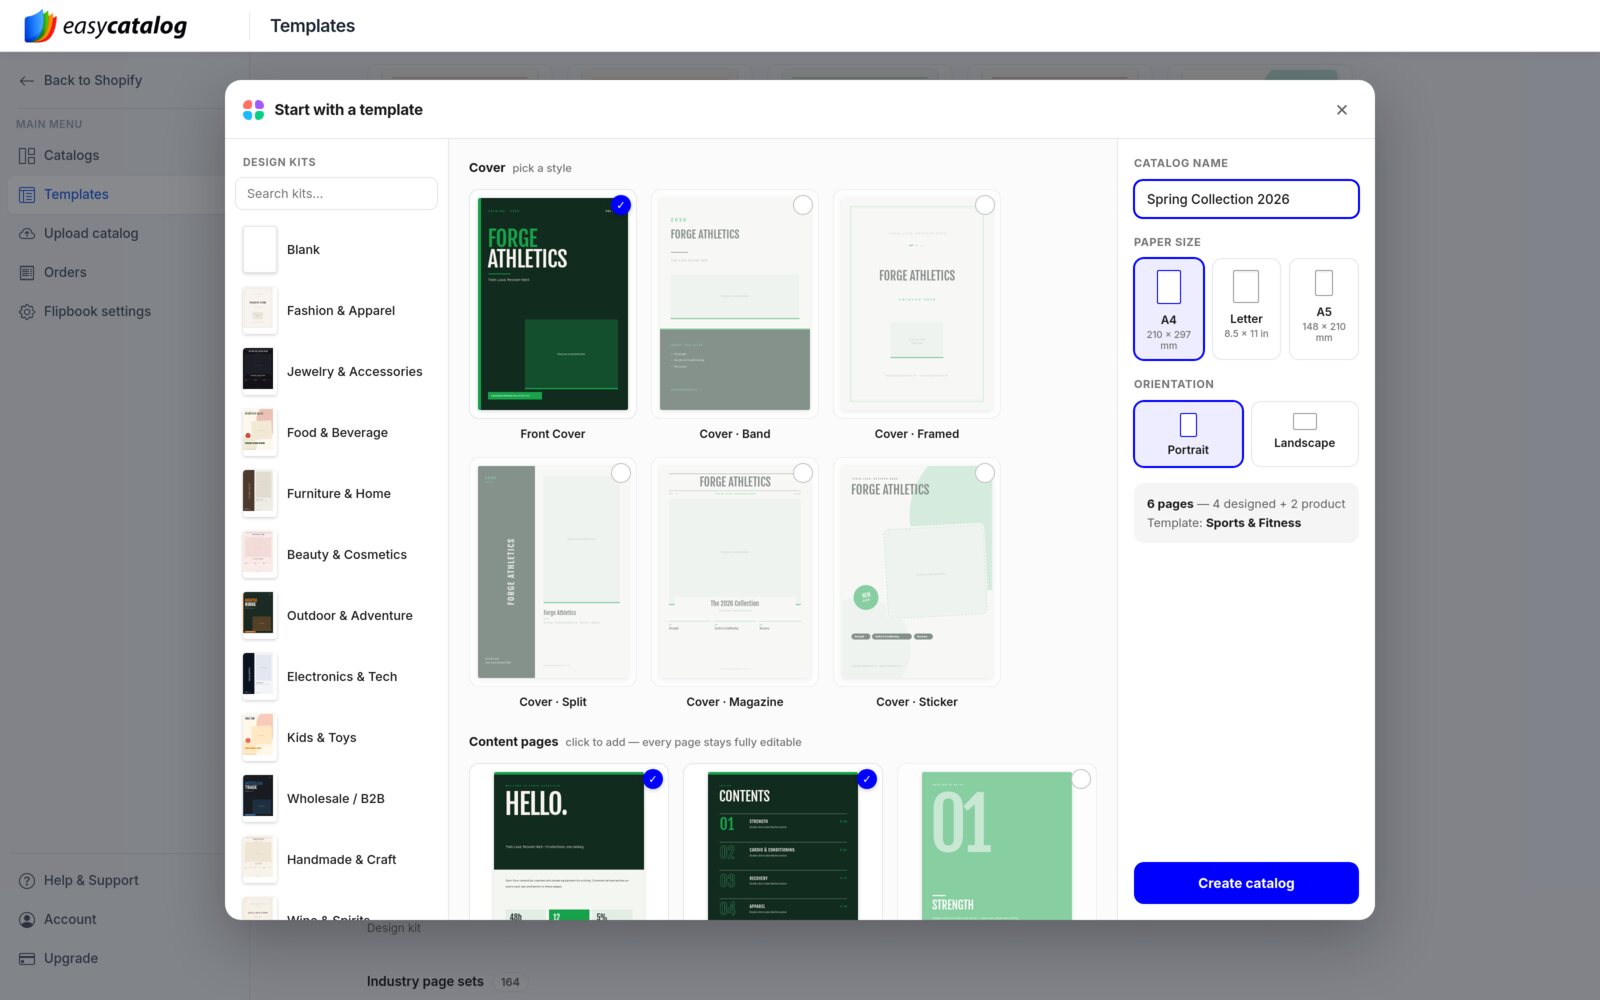
The template gallery opens. Click one of the 20 design kits, or Blank catalog to start from scratch. The Start with a template window opens.
In that window, pick a cover style, click the content pages you want (welcome, contents, FAQ, care instructions and more) and choose the grid for your product pages. On the right, name the catalog and pick the paper size and orientation. Then click Create catalog.
Every color, font and page stays editable later. The first time you open the editor, a short guide explains the basics. Click Got it. I want to add products now to jump to the next step.
Step 2 Bulk Import Your Products
Open Products in the left sidebar, switch to the Inventory tab and click Bulk import products. Click one or more collections. Each one becomes its own section of pages, named after the collection. Drag the numbered chips under Import order to decide which comes first. We picked Sneakers, Boots and Bags & Accessories.
On the right, set the product status, the sort order and how variants are shown. Then pick the currency (any currency you sell in through Shopify Markets), the language, and whether descriptions keep their formatting or come in as plain text.
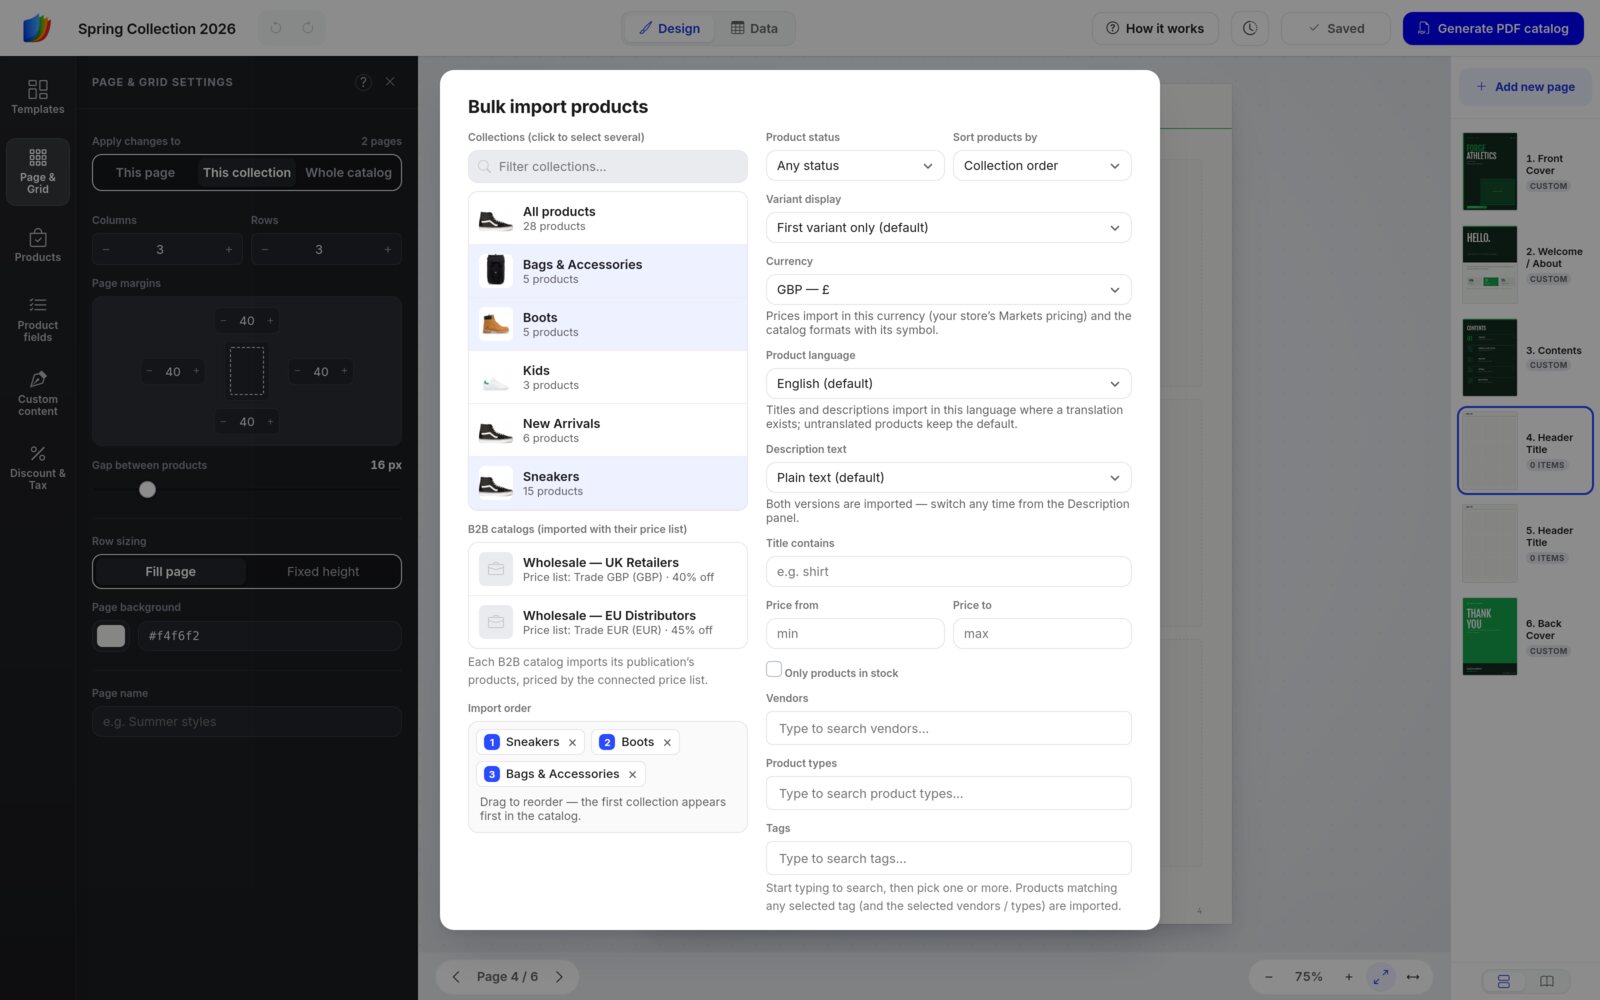
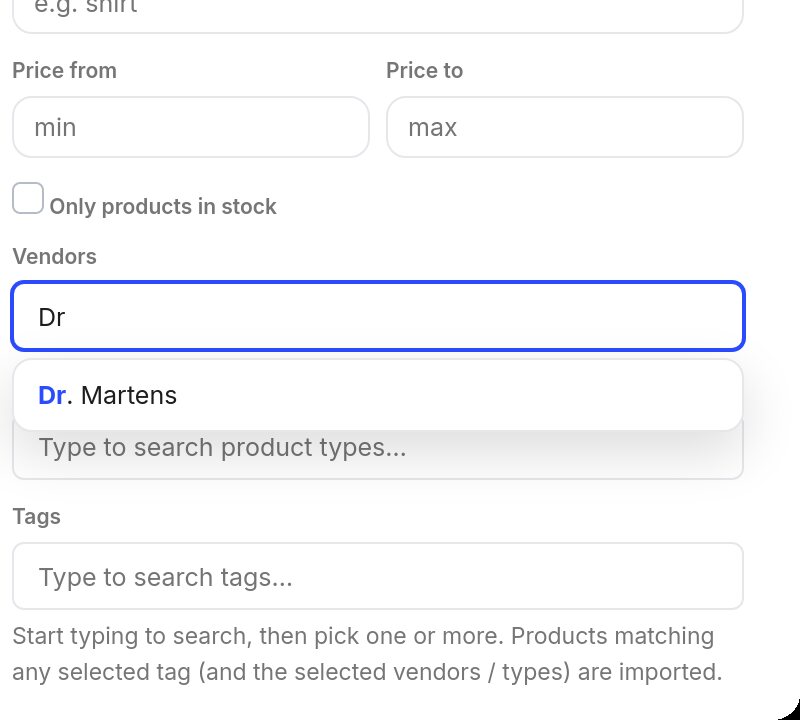
Filters narrow the import down: title, price range, products in stock only, and vendors, product types and tags. These last three search as you type.
Click the import button, which counts your picks (Import 3 collections). The editor adds pages as needed.
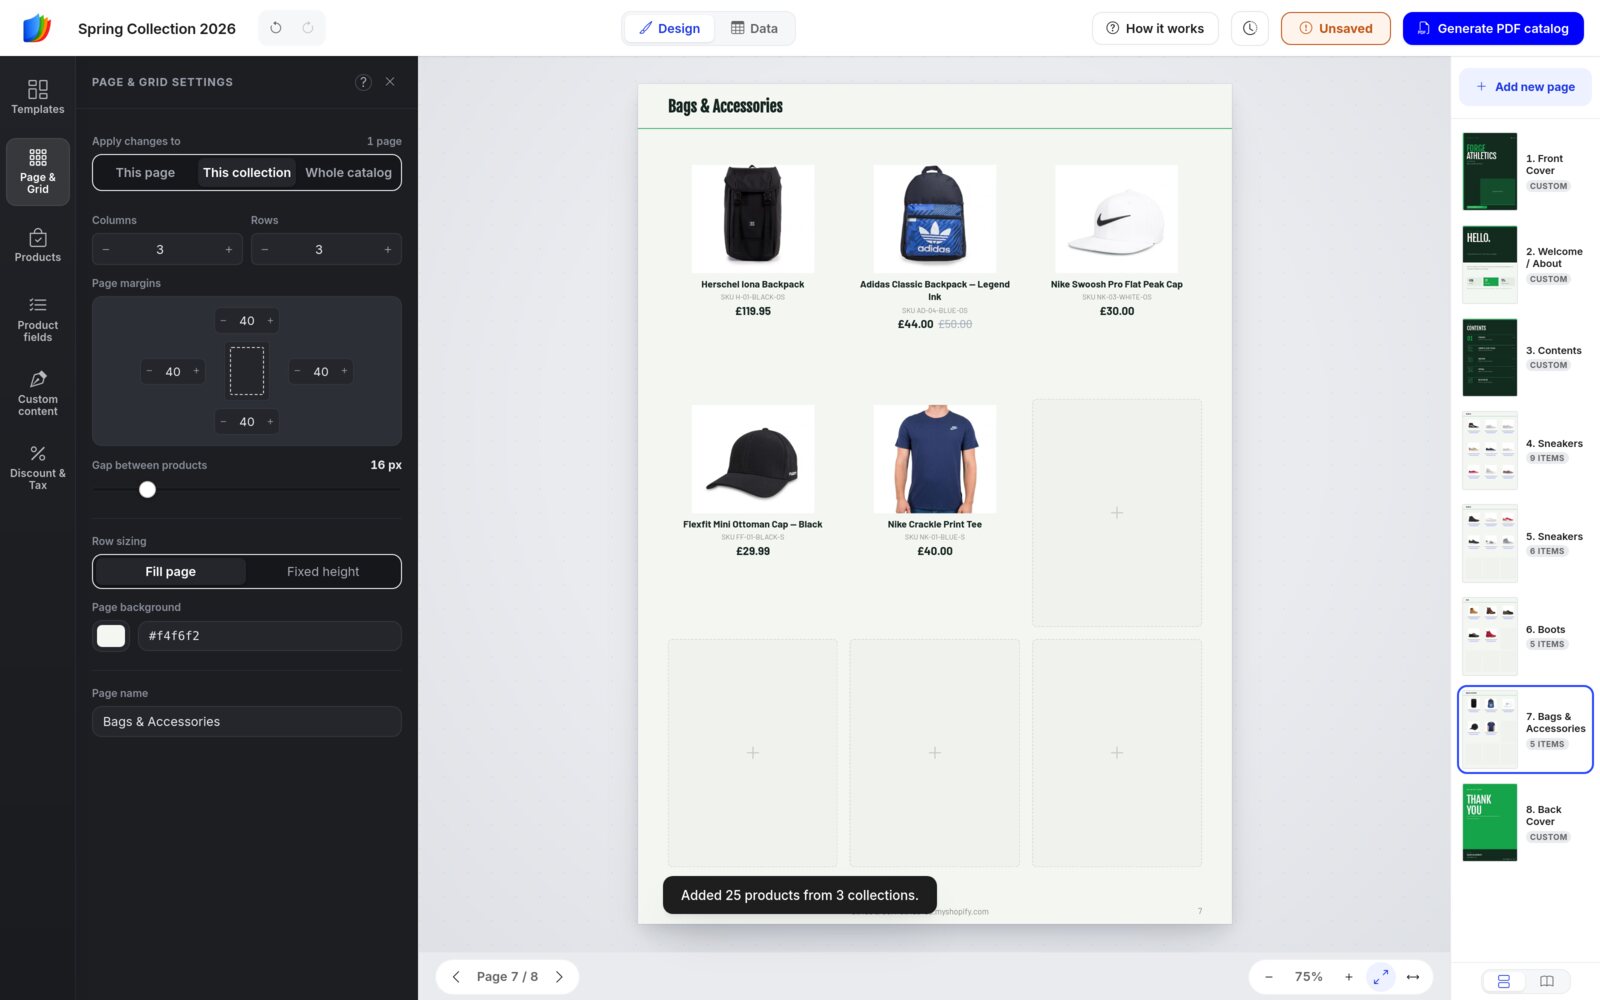
Save as you go. The grid editor does not save by itself. When the button at the top right turns amber and reads Unsaved, click it or press Ctrl + S (Cmd + S on a Mac).
Importing a collection again updates its pages in place.
On the Unlimited and Enterprise plans, Shopify B2B catalogs import with their own price list. Standalone accounts (no Shopify store) see Import (a CSV file, WooCommerce, Google Sheets, Airtable or Dropbox) and Add manually in the Inventory tab instead of Bulk import products.
Step 3 Choose Products One by One
Want one product in one exact spot? In Products, open the Inventory tab and search your store. A plain click adds the product at the start of the current page and moves the others along.
To pick the spot, click an empty + cell first. It turns blue, and the next product you click lands there. You can also drag a product straight onto a cell.
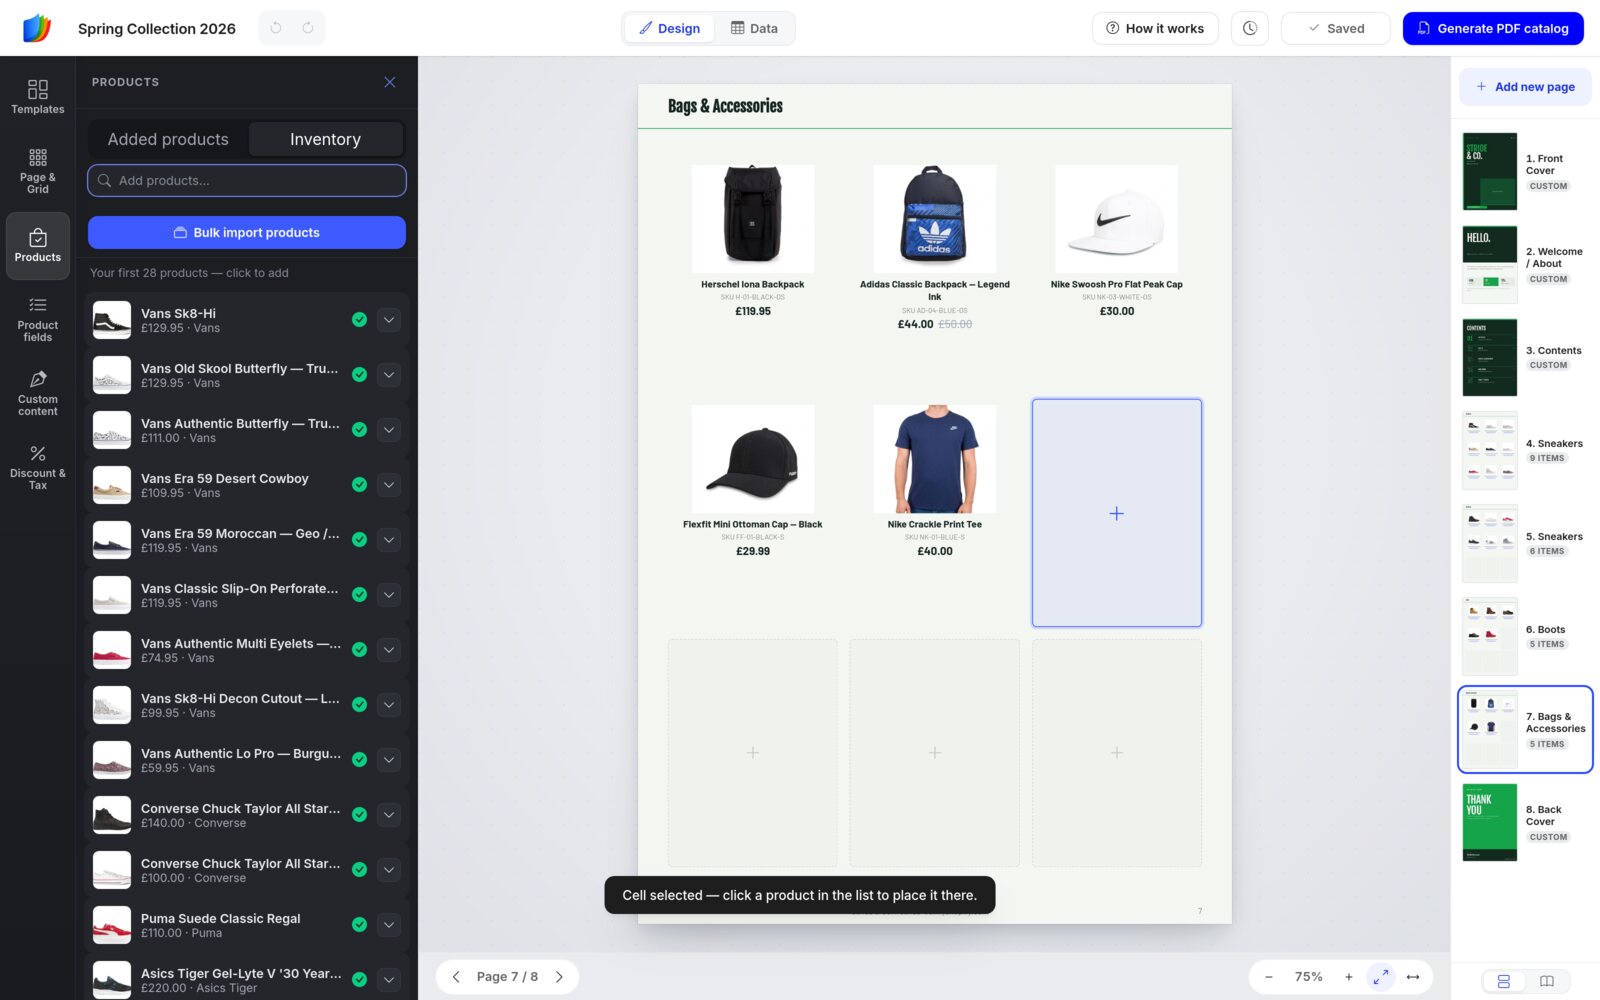
In Inventory, a green check marks products already in the catalog. The small arrow on a row lists the product’s variants, so you can add just one size or color.
The Added products tab lists everything you placed, page by page. Drag a row to reorder, use Sort by, click Reflow to close gaps, or click Sync to refresh titles, prices and images from Shopify.
Step 4 Shape the Grid and Arrange Pages
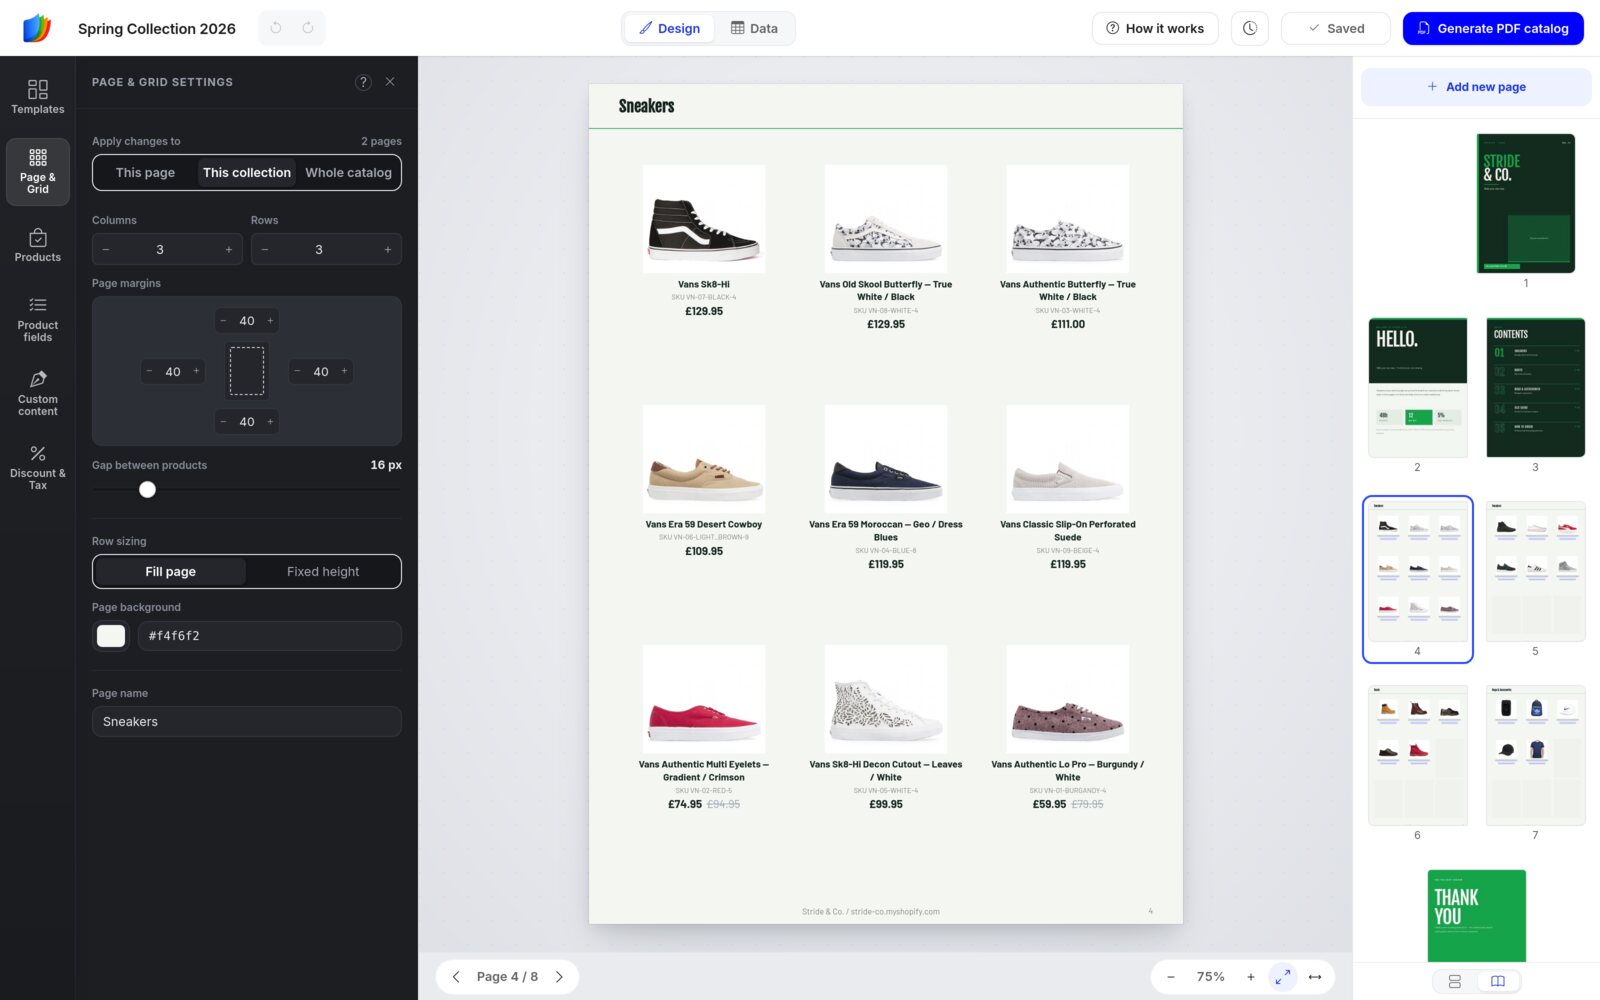
Open Page & Grid to set the Columns and Rows, the margins, the gap between products, the row sizing, the background and the page name.
Apply changes to decides how far a change goes: This page, This collection or Whole catalog. When a page gets fewer cells, the extra products move to the next pages. Nothing is lost.
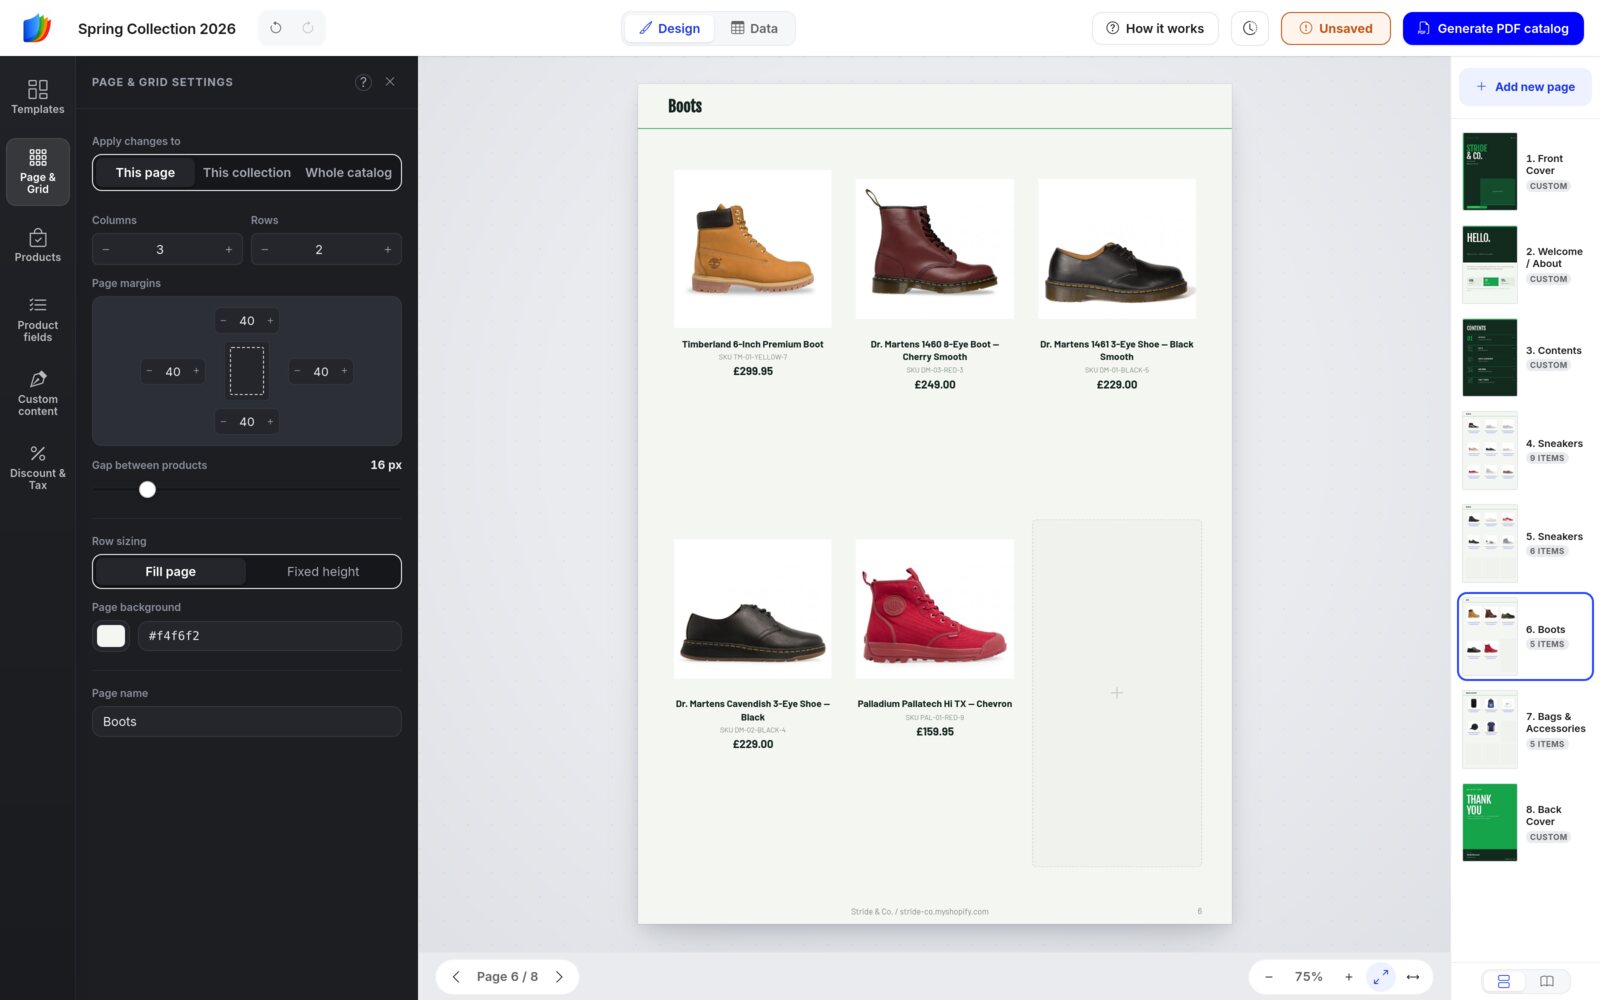
Click the header (the title strip at the top of the page) to change its text, font and colors. Need more pages? Click Add new page for product grids from 2 × 2 to 4 × 5, a Blank canvas, mosaic layouts and your kit’s content pages.
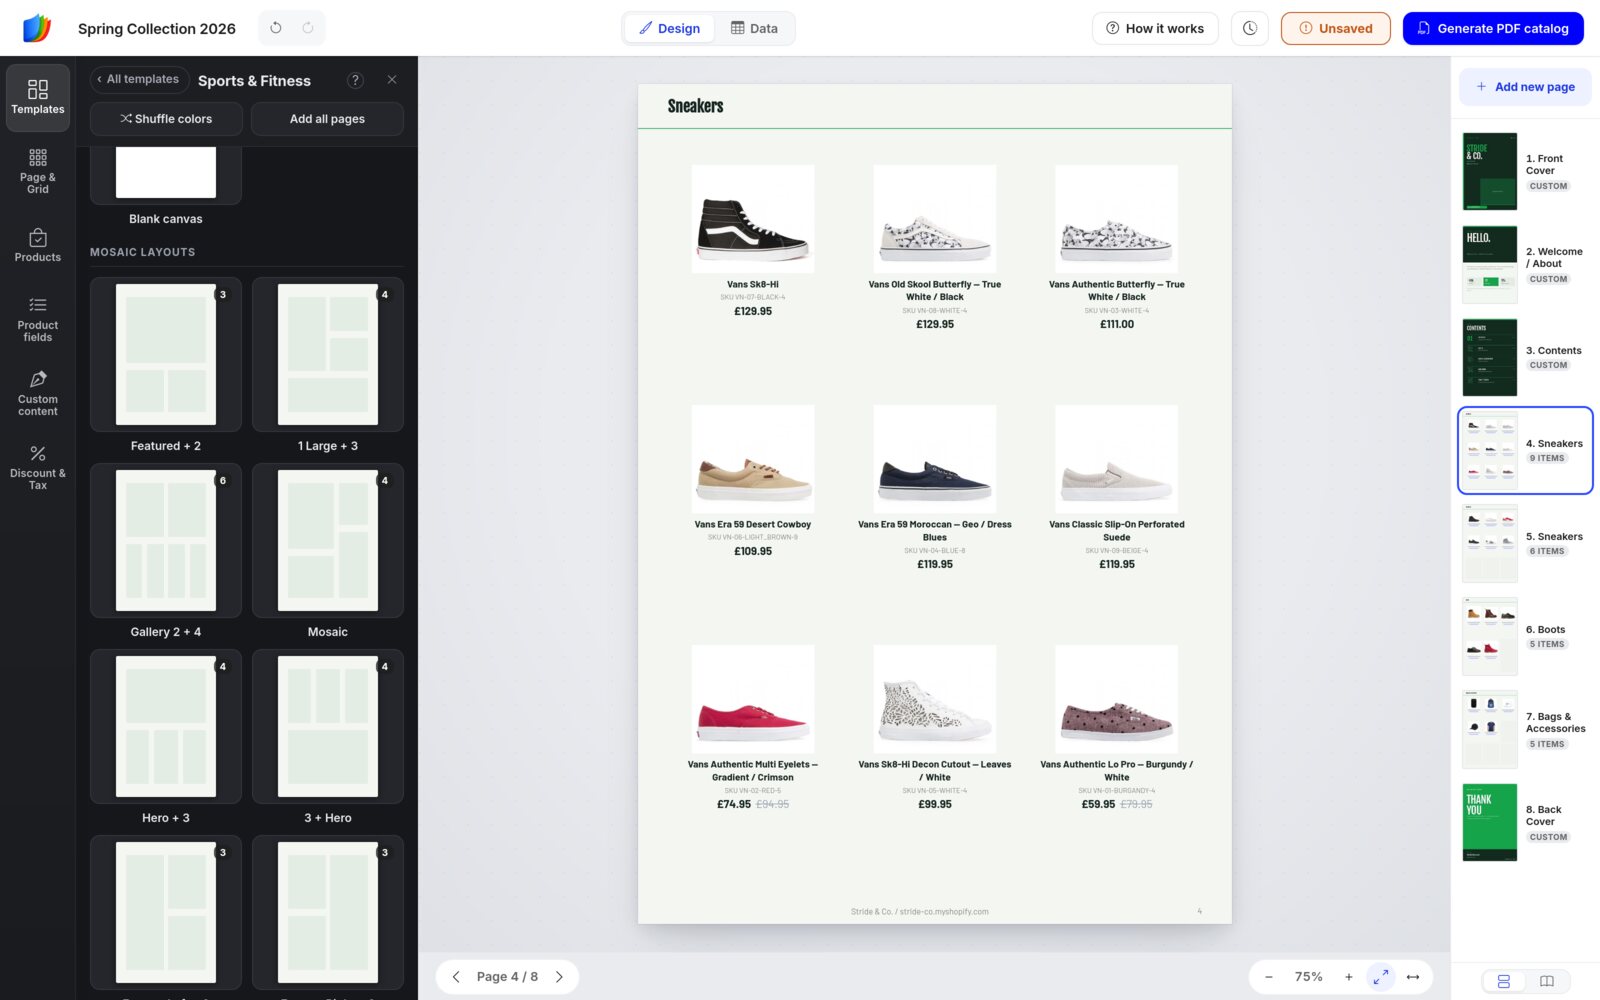
To rearrange the catalog, use the Pages sidebar on the right. Drag a page to move it. To move several pages together, Ctrl-click them (Cmd-click on a Mac) or Shift-click them, then drag. Hover a page to duplicate or delete it.
The two buttons at the bottom of the Pages sidebar switch between a list and a book view. Book view shows your pages as two-page spreads, the way they face each other in print.
Step 5 Style the Product Cards
In Product fields, tick what the cards show, such as image, title, SKU, price, vendor, barcode or a QR code. Drag the handles to change the order.
Cards show Discount price by default. It shows your normal price until a discount is set, for example in Step 7.
Then click a product on the page. A Styling item appears at the bottom of the left sidebar, and the secondary panel turns white to show the product’s settings.
Every Styling panel starts with Apply changes to: This product, This page or Whole catalog. Pick the scope first, then make the change.
Set the card layout, font, alignment and background, how many photos to show, the image size, fit or crop, and borders.
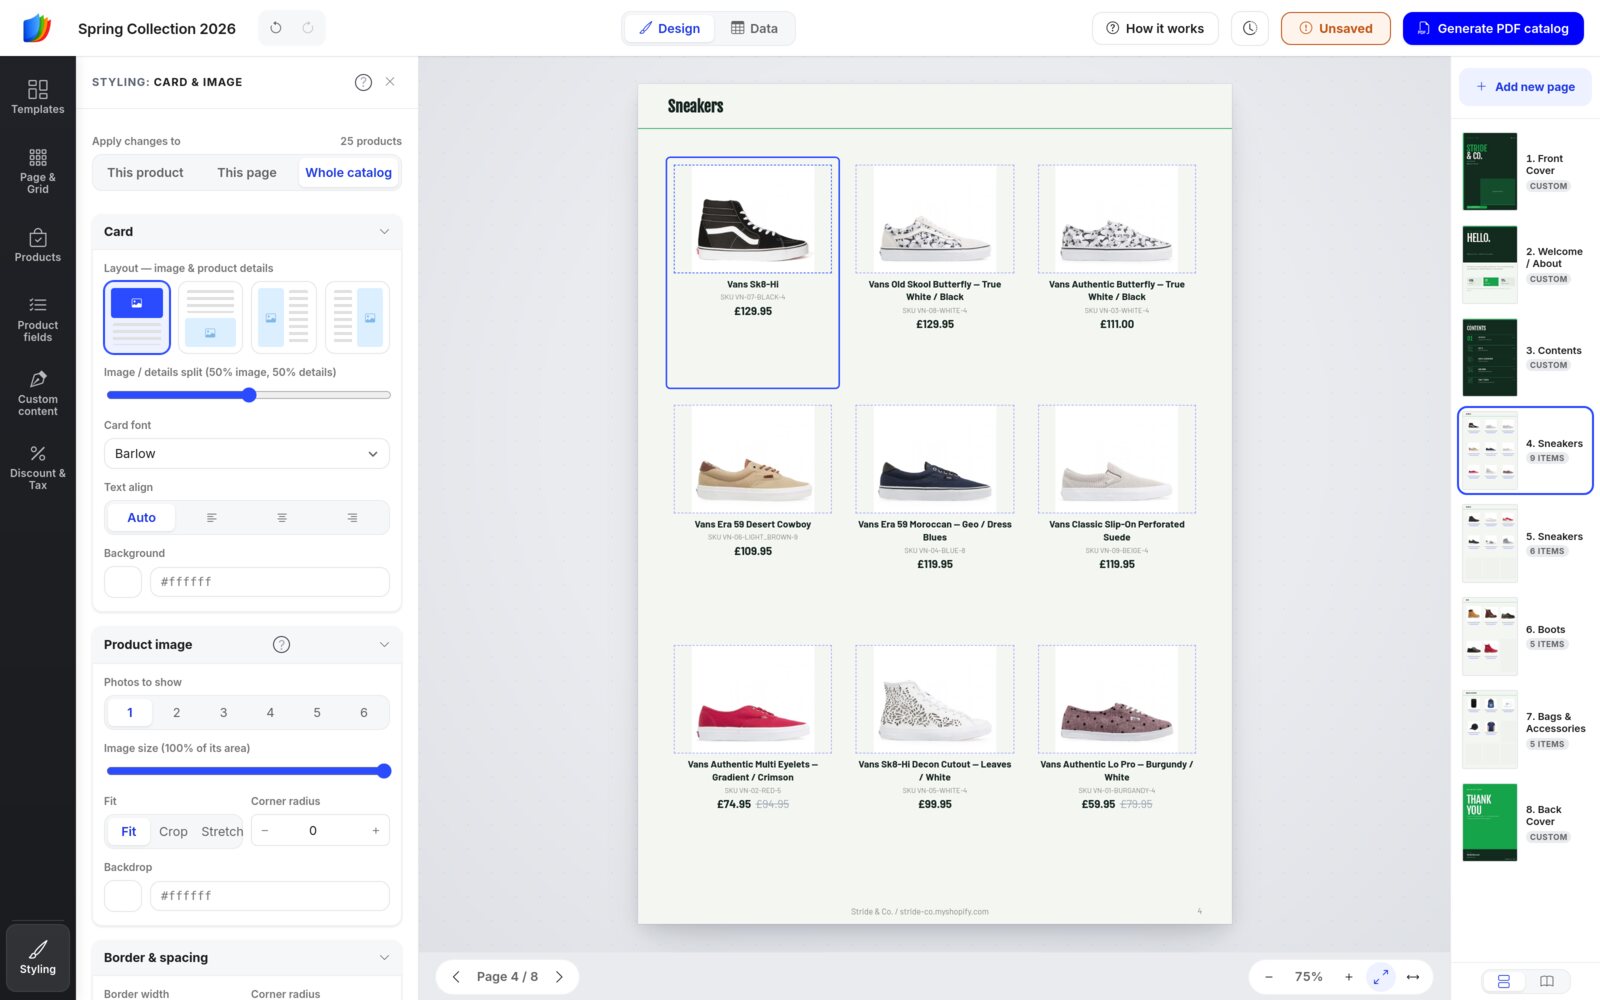
Click a single field, like the title or the price, to style only that field. The price format covers the currency symbol, decimals, number format (1,299.00 or 1.299,00), text before or after, and a struck-through compare-at price.
Step 6 Design Your Cover and Content Pages
The cover, welcome and contents pages are design pages. You place text, shapes and images anywhere on them.
Open Custom content in the left sidebar and pick a tool from its row: Text, Shapes, Images, QR code or Colors. You get headings, badges like SALE and NEW, over 1,400 vectors, QR codes and images (your product photos, your uploads, free stock photos or an image link).
Click an element to change its font, size, spacing, fill, opacity, shadow or link. Double-click text to change the words.
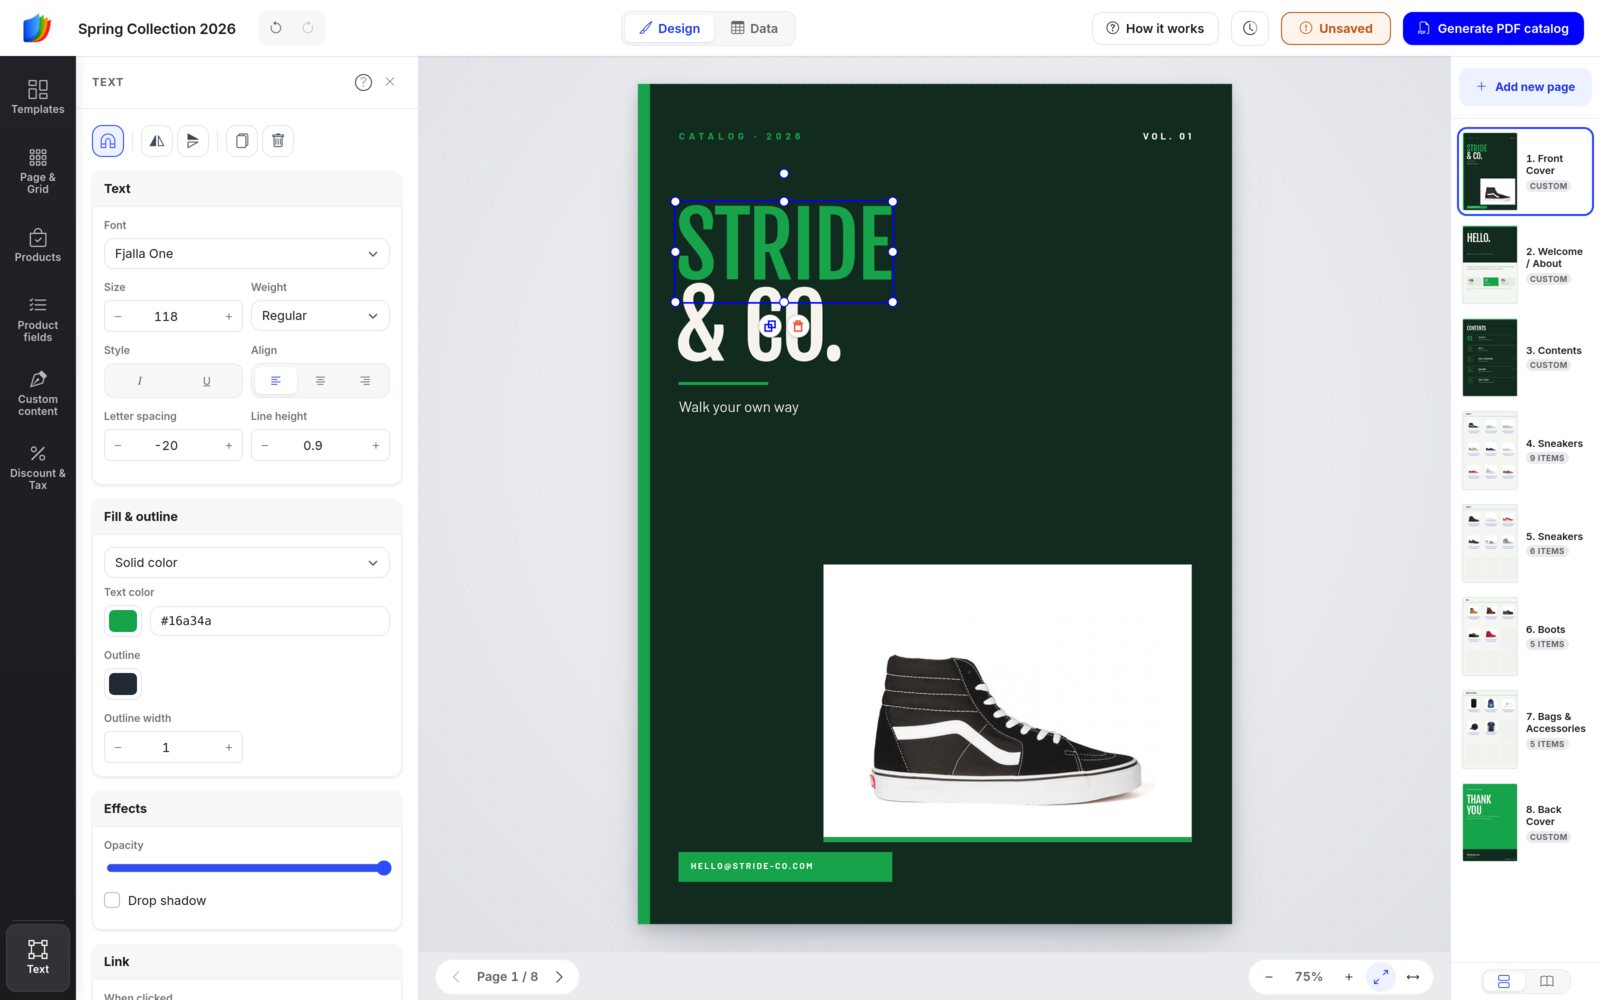
To repeat a logo or badge, select it and use Copy to pages: All product pages, All content pages or All pages.
Colors, the last tool in Custom content, recolors the catalog. Use Shuffle colors, or pick a kit’s palette for this page or the whole catalog.
Step 7 Set Discounts and Prices
Want catalog prices that differ from your store? Open Discount & Tax. Enter a percentage or fixed discount, a tax to remove, or a Multiplier such as an exchange rate. The preview shows the old and new price of the product picked under Select product.
Nothing changes until you press an Apply to button: Selected product, This page, This collection or Whole catalog.
A discount applied here replaces B2B price-list, metafield and hand-typed discount prices for those products. To remove it and get those prices back, set the discount to 0 and apply it again.
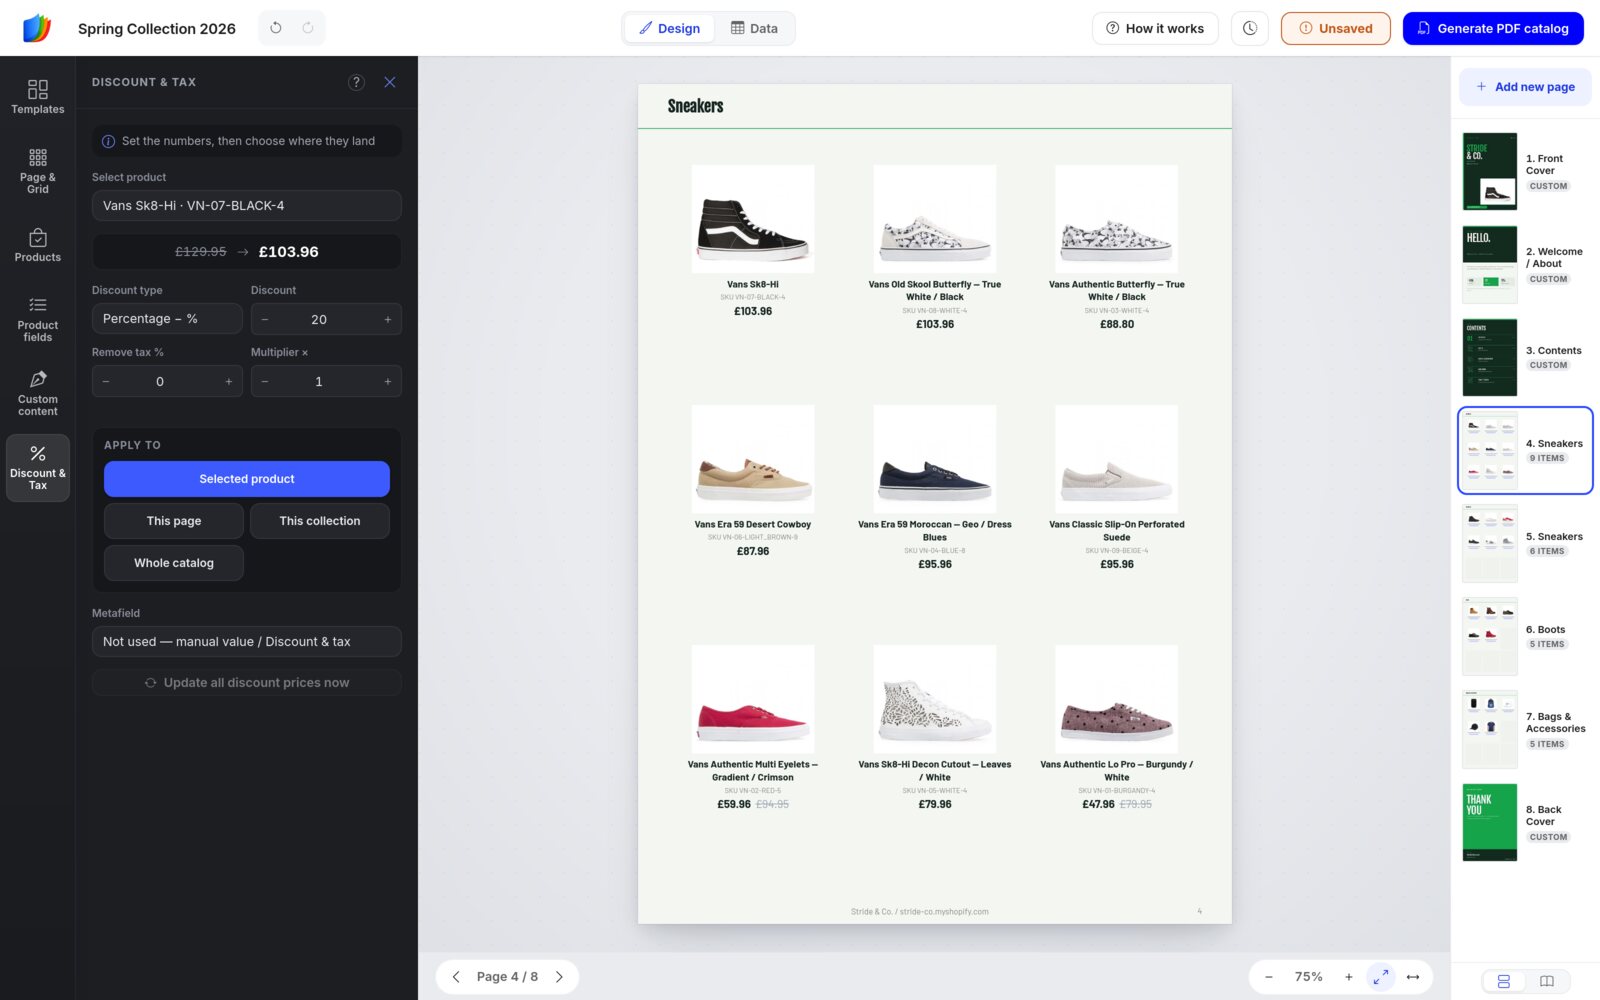
On Shopify, discount prices can also come from a metafield, a custom field you keep on your products. None of this changes the prices in your store.
Step 8 Edit Product Details in the Data View
Switch the top bar from Design to Data, and your catalog becomes a spreadsheet with one row per product. Edit titles, SKUs, prices, discounts and descriptions. Paste a column from Excel, filter the list, or click a column heading to sort.
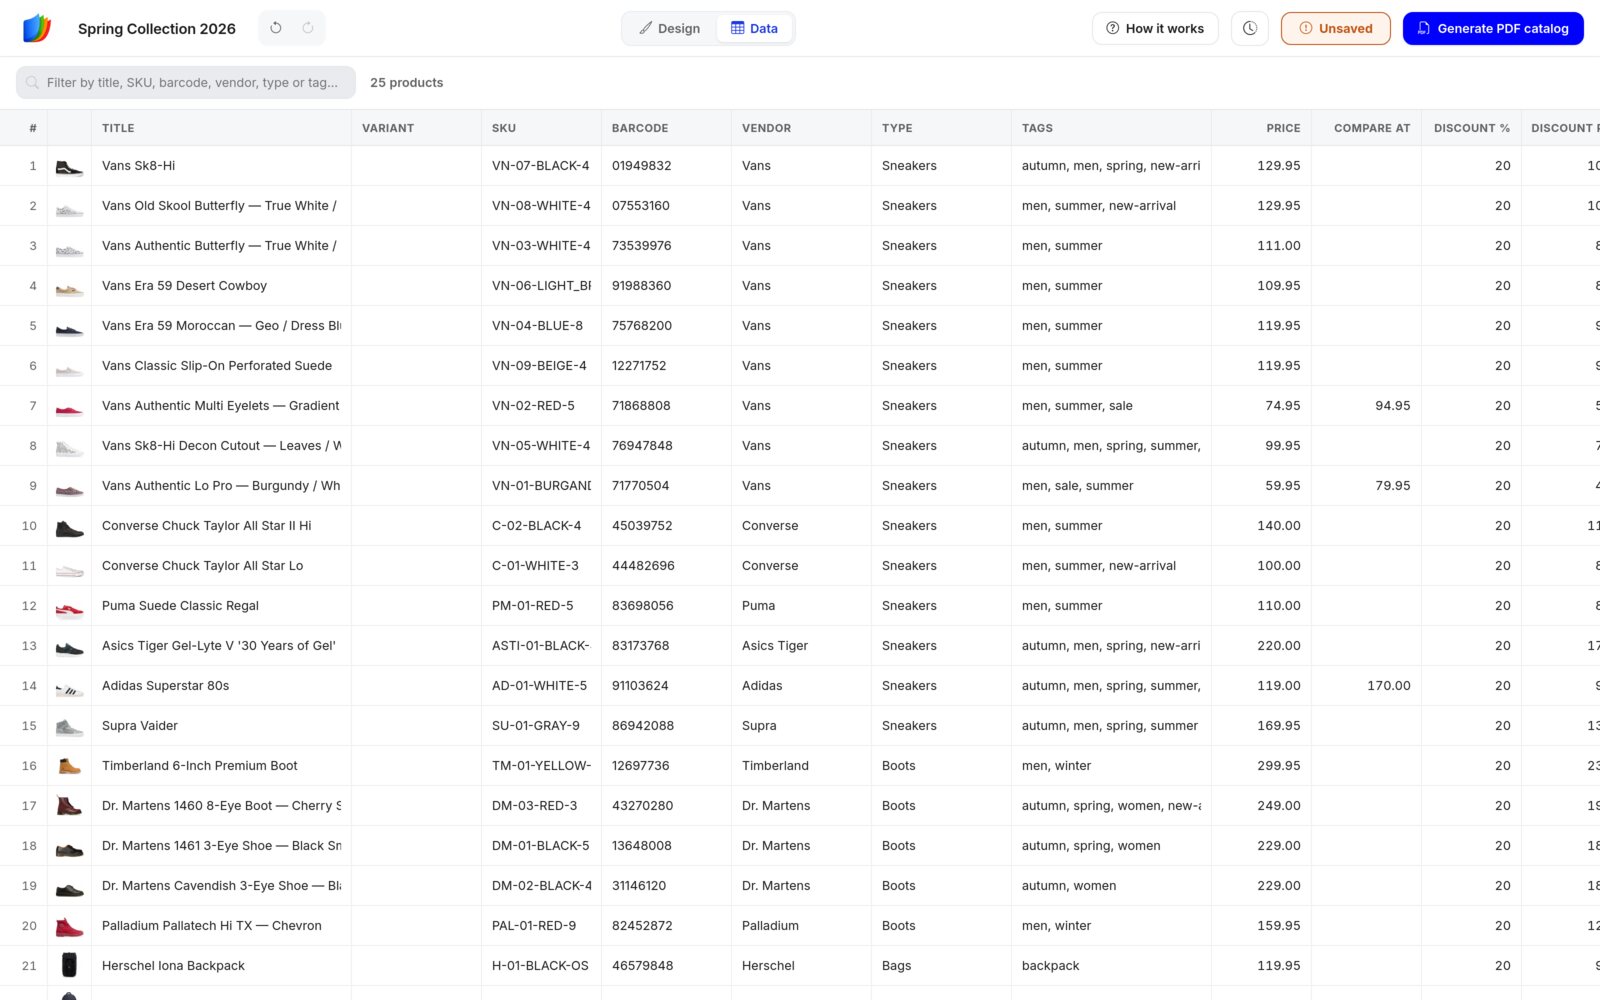
These edits change the catalog only, never your store.
Step 9 Save and Use Version History
Remember, the grid editor does not save automatically. The Save button shows Saved, Saving… or an amber Unsaved. Click it, or press Ctrl + S (Cmd + S on a Mac). Your browser warns you before you leave with unsaved changes.
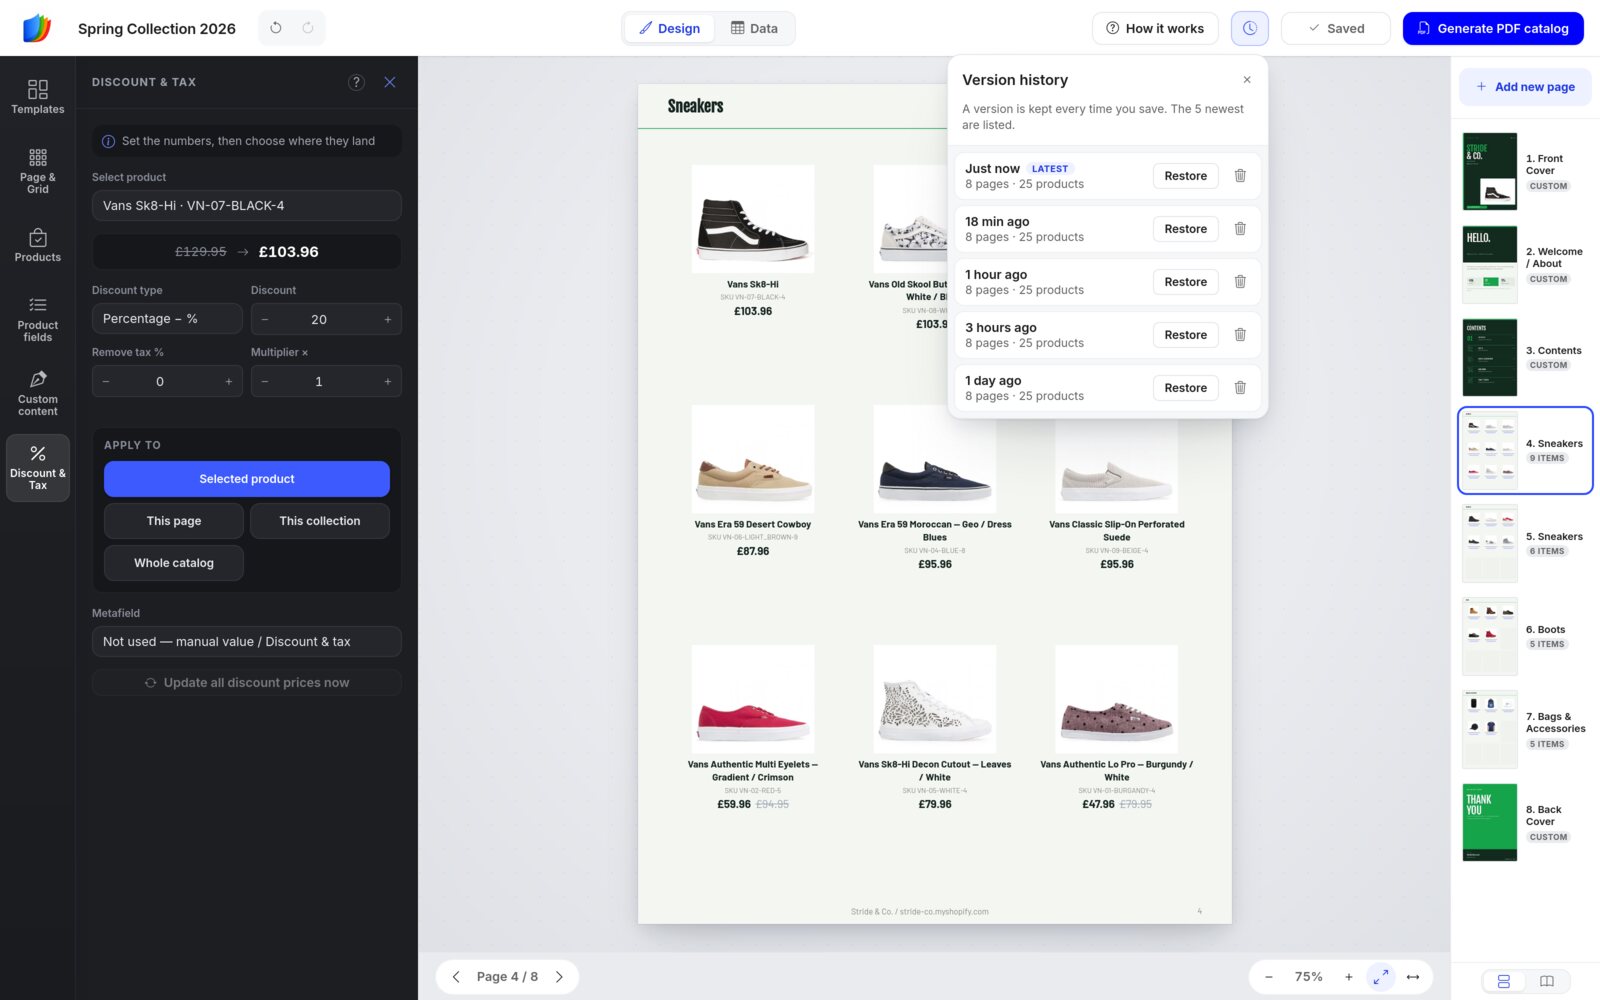
Every save keeps a version. Click the clock icon to see the five newest and Restore any of them. Your current saved state is kept as a version too, so you can change your mind.
Step 10 Generate the PDF
Click Generate PDF catalog. Check the name (it becomes the file name) and pick a print quality:
- Draft (72 DPI) for a quick look.
- Standard (150 DPI) for screens, email and links.
- High quality or Best quality (300 DPI) for printing.
- Print professional (300 DPI, CMYK) when a print shop asks for CMYK.
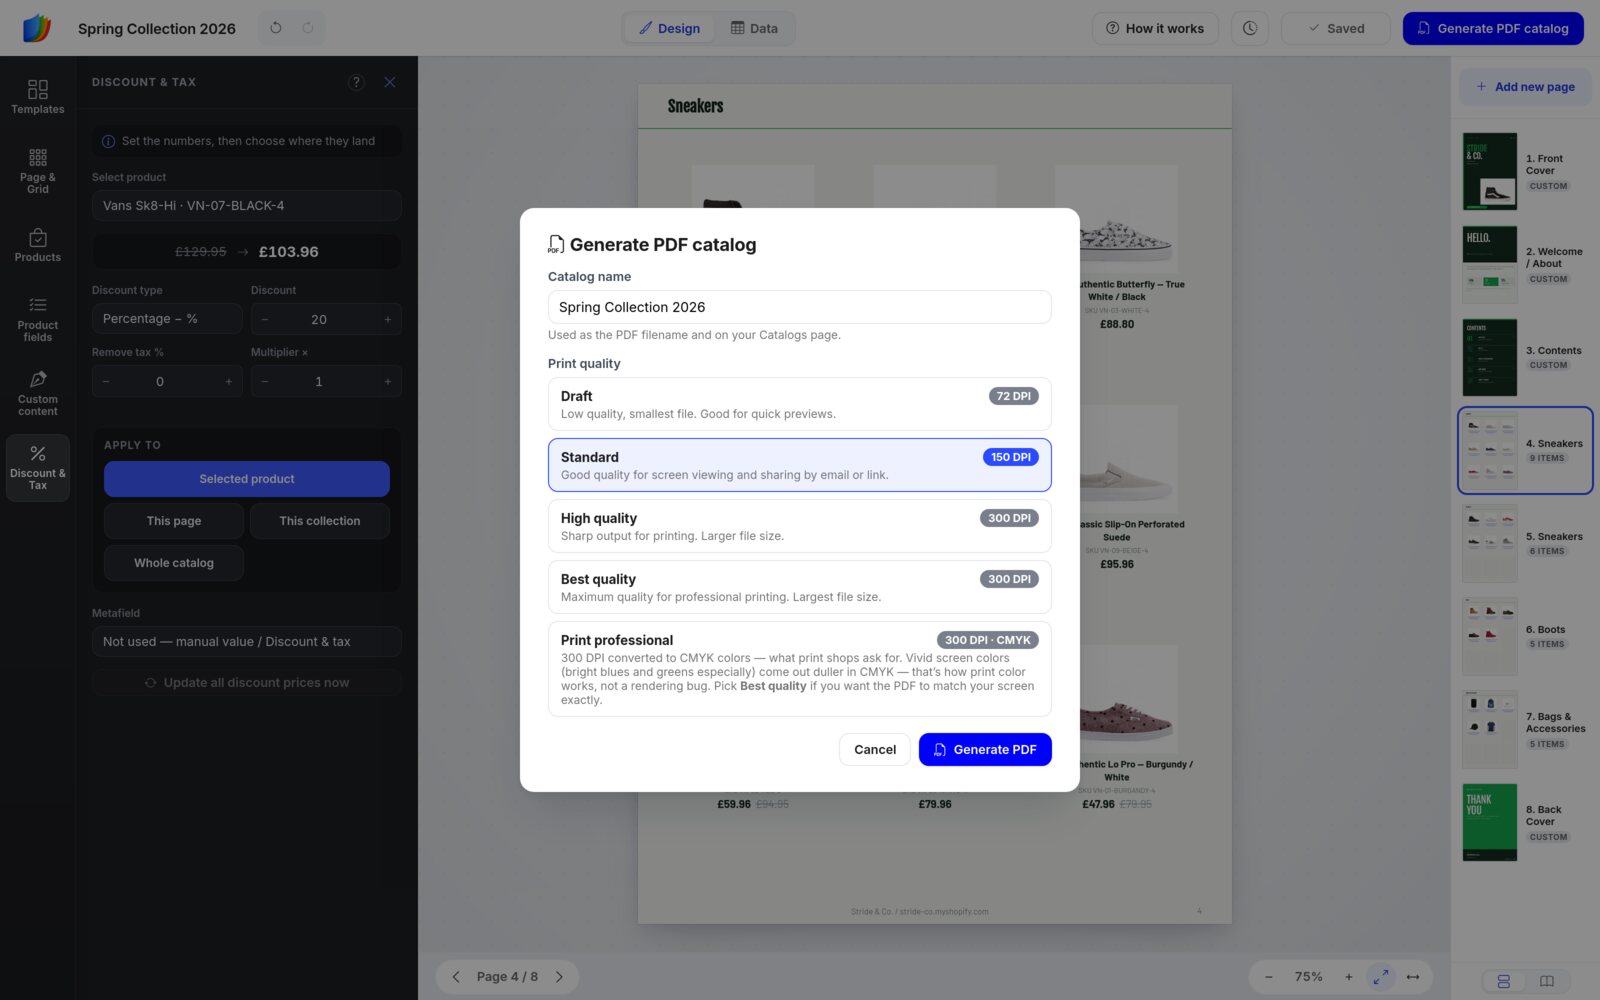
Click Generate PDF. Your work is saved and you land on the Catalogs page. The card shows In progress and refreshes itself when the PDF is ready. Leaving the page does not stop it. On the Free plan, the PDF carries a small watermark.
Step 11 Share It and Take Orders
The finished catalog card gives you four links, each with Copy link and Get QR. The three flipbook links also have Preview:
- PDF: the file, with a Download button.
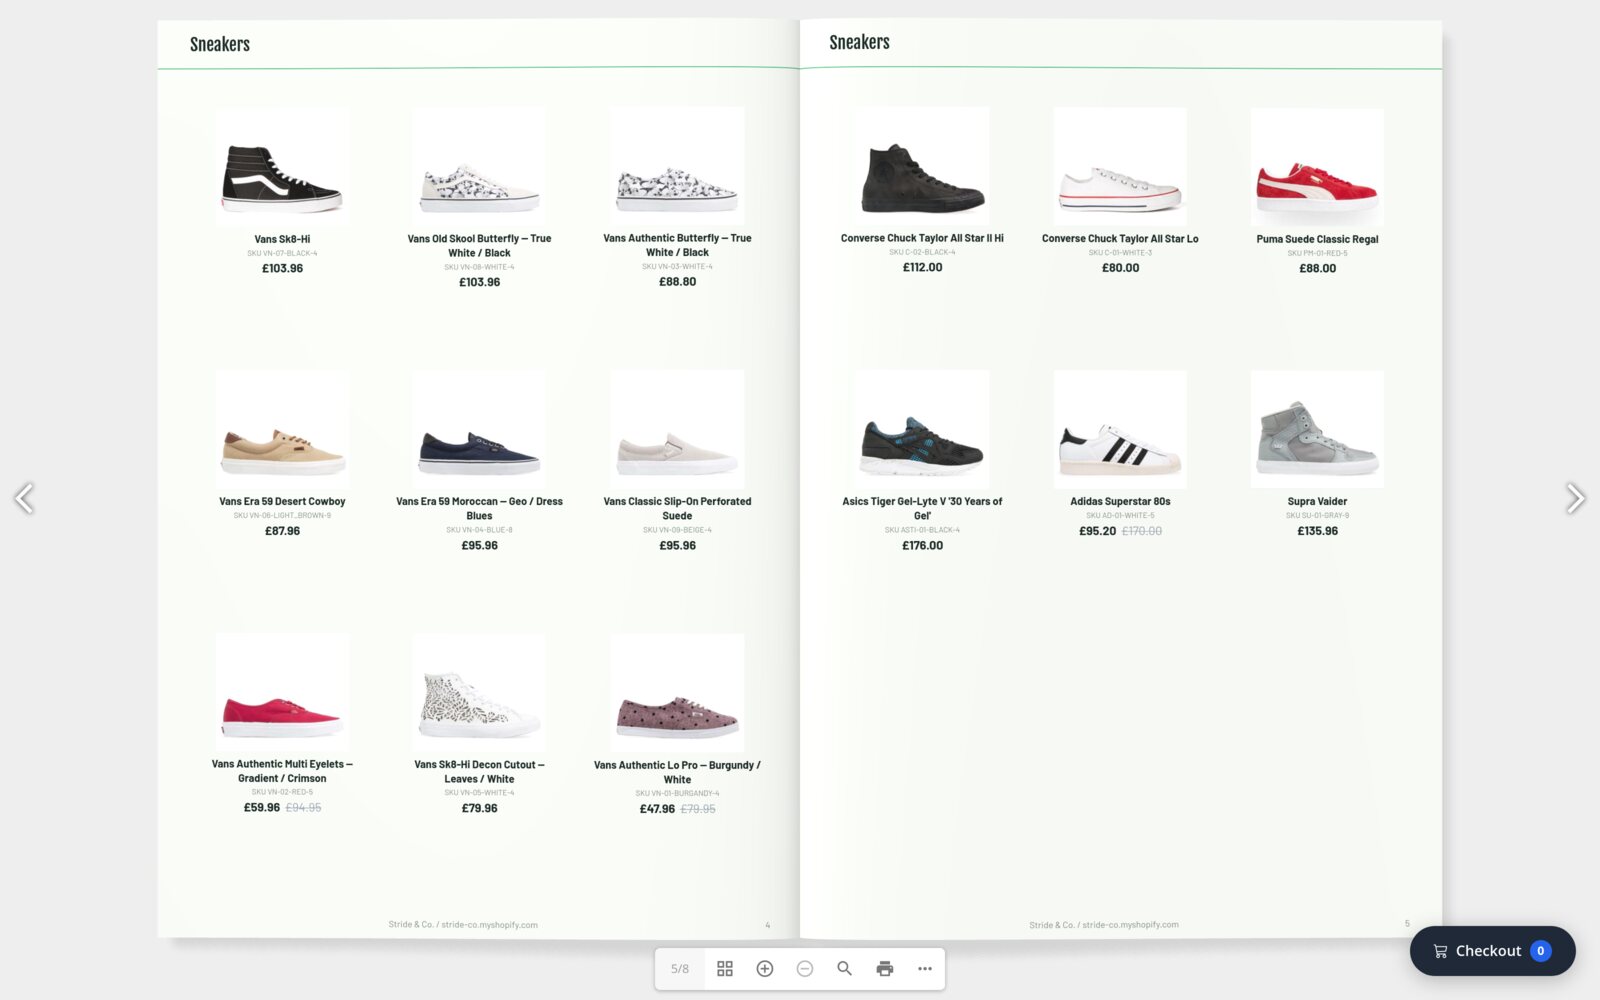
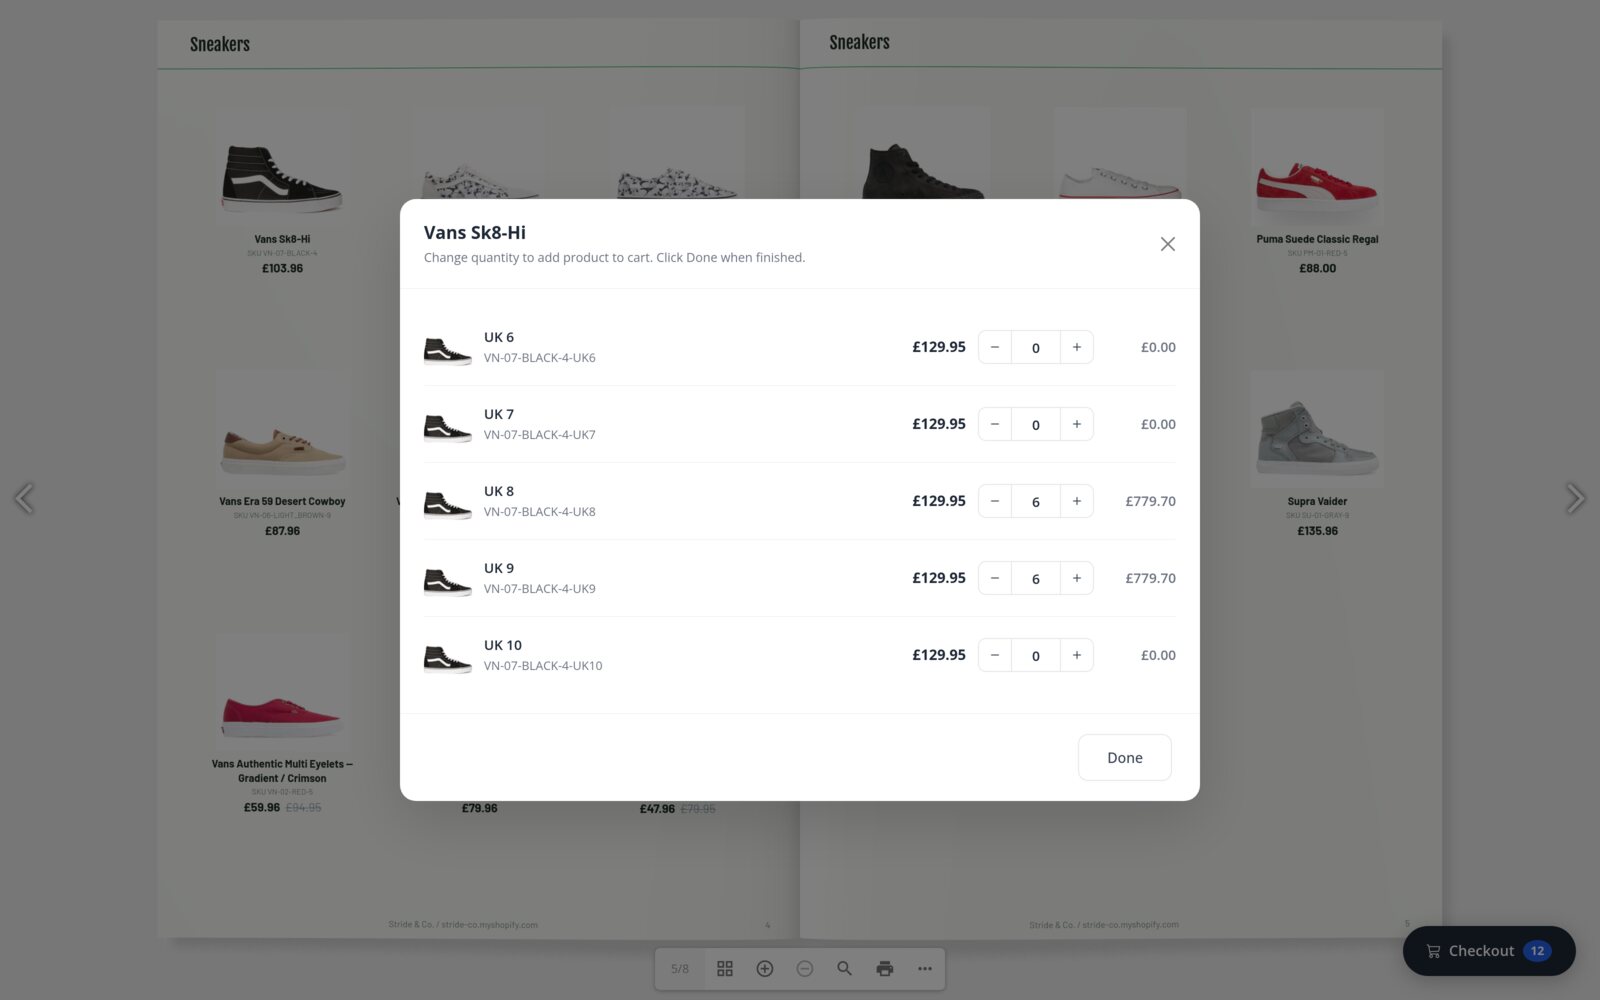
- Wholesale: a flipbook with a built-in order form. Buyers pick quantities for each variant and send you the order.
- Retail: a flipbook whose cart goes to your Shopify checkout (Shopify stores only).
- Showcase: a browse-only flipbook for social media, press or retail partners.
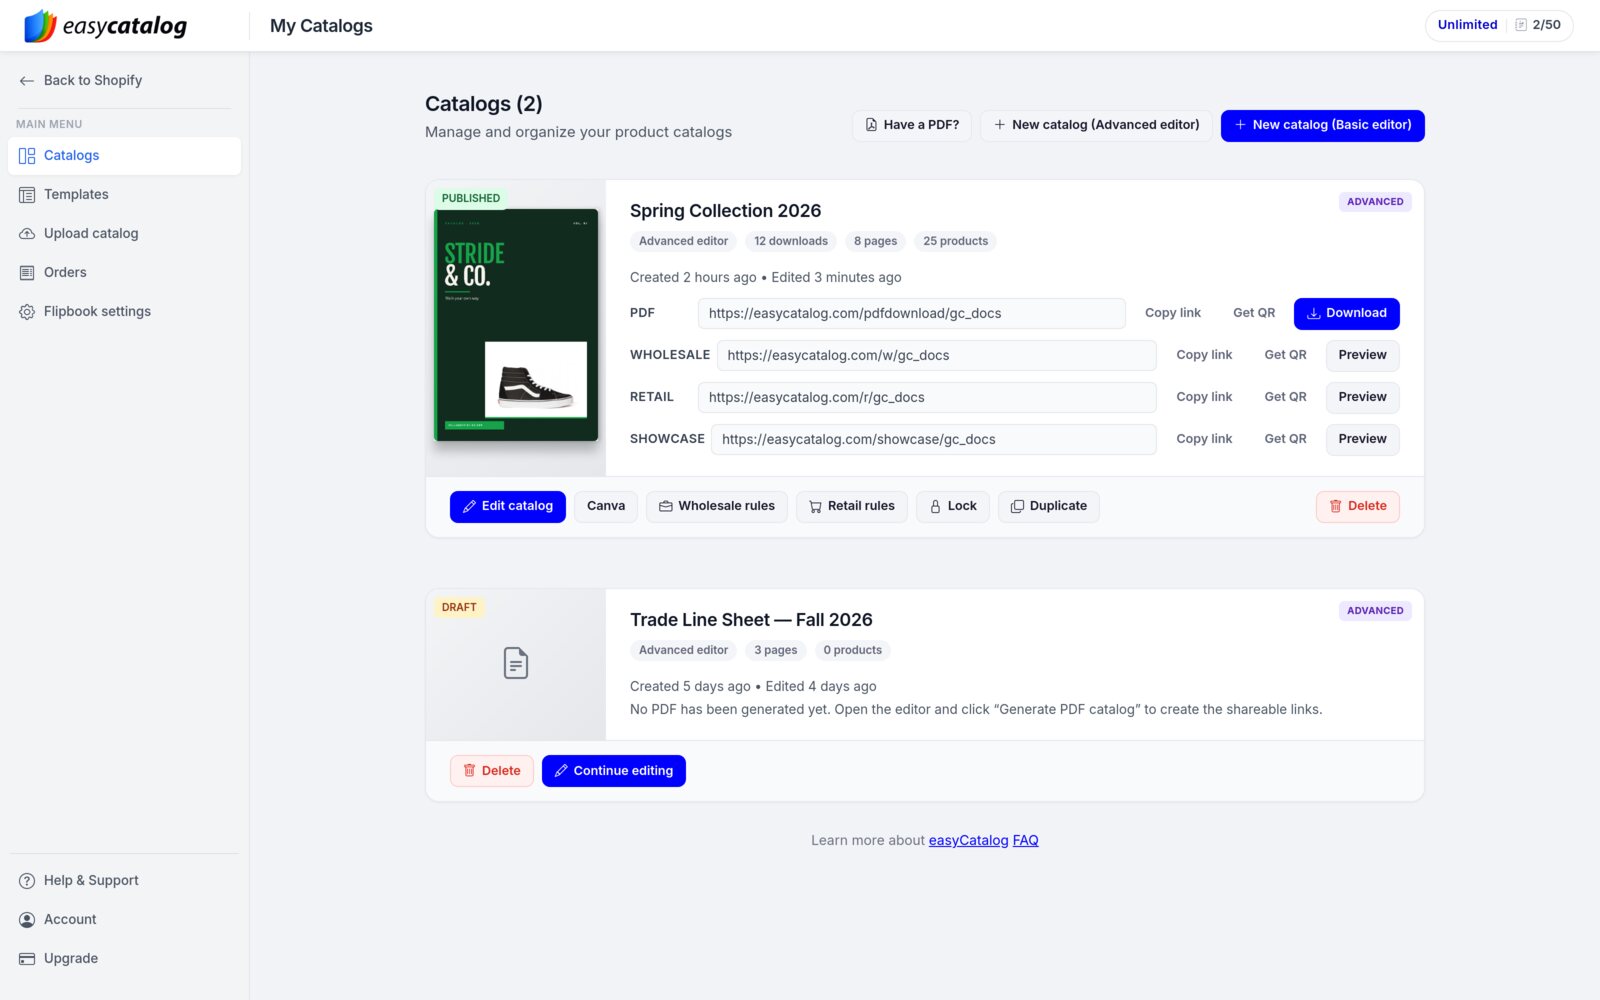
The buttons under the links control how the catalog is shared:
- Wholesale rules: a minimum order value, the price mode (Real-time Shopify uses live store prices, Catalog discount uses the prices printed in the catalog), out-of-stock ordering and volume discounts.
- Retail rules (Shopify only): a discount code and a cart note for checkout.
- Lock: a password for the public links.
- Duplicate: a copy of the catalog, for example for next season.
To update a catalog, click Edit catalog and generate the PDF again.
This is the Wholesale link as your buyers see it. They flip through the pages and click a product to order it.
Handy Shortcuts
- Ctrl / Cmd + SSave
- Ctrl / Cmd + ZUndo
- Ctrl / Cmd + Shift + ZRedo
- DeleteRemove the selected product
- EscDeselect
- ← / →Previous or next page (when nothing is selected)
Read the Full Guide
That is the whole flow, from template to order. Each step has more options than one post can hold.
The complete grid editor guide
Every panel, every setting and every screen, step by step. Open the grid editor documentation.
Looking for a starting look first? Browse the template gallery.
Try the New Grid Editor
Pick a design kit, add your products and generate a shareable PDF catalog.