

Your catalog is finished, you email the print shop, and the reply is a short list: 3 mm bleed, crop marks, CMYK, 300 DPI. None of it is hard once you know what each word means. This guide explains them in plain language, then shows exactly which settings in EasyCatalog produce a file your print shop can use.
The short version
- Paper size: pick A4, Letter or A5 when you create the catalog.
- Resolution: export at 300 DPI (High quality, Best quality or Print professional).
- Color: pick Print professional when the print shop asks for CMYK.
- Bleed: pick 3 mm or 5 mm under Bleed, and tick Crop marks if the shop wants them.
- Send the right file: the Print file from your Catalogs page, not the normal PDF.
What print-ready actually means
A print shop rarely prints your catalog on paper that is exactly the size of your page. It prints on bigger sheets, then cuts them down to size, folds them and binds them. Cutting to the final size is called trimming.
A print-ready file is one that survives that process. Nothing important gets cut off, no thin white lines appear along the edges, photos are sharp, and the colors are in the format the press uses.
Most shops check five things: bleed, crop marks, color mode, resolution and page size. The sections below take them one at a time. If you already know the terms, skip to how EasyCatalog exports a print file.
Bleed: color that runs past the edge
Paper shifts a little on its way through the cutter. A blade that lands a millimeter off leaves a thin white sliver along any page whose background or photo runs to the edge.
Bleed prevents that. Everything that touches the page edge is extended a few millimeters past it. The shop still cuts on the page edge, called the trim line. If the blade drifts, it cuts through extra color instead of white paper.
- Bleed. The hatched strip outside the page. It gets cut off. The background and the photo in the corner run into it.
- Trim line. The dashed line where the blade cuts. This is your real page size.
- Safe zone. The dotted line. Keep text and logos inside it, so a slightly crooked cut never clips them.
- Crop marks. The short lines in the white corners. They line up with the trim line and show the shop where to cut.
How much bleed? 3 mm is the most common, just under 1/8 inch. Some shops ask for 5 mm. If yours works in inches and asks for 1/8 inch, check whether 3 mm is close enough, or use 5 mm. When in doubt, ask.
Bleed only matters for things that touch the edge. A page with a plain white background and a margin all around looks the same with or without it. Covers usually need it most.
Crop marks and the safe zone
Crop marks, also called trim marks, are thin lines printed in the corners, outside the bleed. They tell the person at the cutter exactly where your page ends.
Not every shop wants them. Many arrange several pages on one big sheet and add their own marks. Ask, then tick the box or leave it empty.
The safe zone is the opposite of bleed: a band inside the page edge where nothing important should sit. Keep text, prices, logos and page numbers at least 3 to 5 mm inside the edge, or whatever your print shop recommends.
In EasyCatalog, new product pages from the templates start with 20 px page margins. That is about 5 mm, so the product grid already sits inside a typical safe zone. You can change it under Page margins in Page & Grid. Covers and other design pages let you put text anywhere, so check anything placed close to an edge.
CMYK vs RGB: why colors change on paper
Screens make color with light: red, green and blue, or RGB. Printing presses make color with ink: cyan, magenta, yellow and black, or CMYK. Ink on paper can’t glow, so it can’t reach some of the brightest colors a screen shows.
When a file is converted from RGB to CMYK, those colors move to the closest color the inks can print. Bright blues and greens change the most and look duller. That is how print color works, not a fault in the file.
Which one do you need? Commercial presses print in CMYK, and many print shops ask for CMYK files so there are no surprises. Many digital printers, and almost every office or home printer, take RGB and convert it themselves. Ask your print shop.
If a bright brand color turns flat in the CMYK file, choose a slightly calmer shade. In the editor, open Theme, then the Colors tab, and leave Apply to on Whole catalog. Under Your colors, click a swatch, such as Accent, and pick a new shade. Everything that uses that color follows. Then generate the PDF again.
When color really matters, ask the shop for a printed proof before the full run. A screen can only hint at how ink will look on paper.
300 DPI: how sharp is sharp enough
DPI means dots per inch: how many pixels of a photo land on each inch of paper. Screens look fine at 72 to 150. Print needs about 300 at the size the photo appears on the page.
The rule of thumb: pixels needed = printed width in inches × 300. For centimeters, divide by 2.54 first.
| Photo printed at | Pixels needed at 300 DPI |
|---|---|
| 5 cm (about 2 in) wide | About 590 px wide |
| 10 cm (about 4 in) wide | About 1,180 px wide |
| A full A5 page | 1,748 × 2,480 px |
| A full A4 page | 2,480 × 3,508 px |
| A full Letter page | 2,550 × 3,300 px |
Two things to know. First, a higher setting can’t add detail that isn’t there: a 500 px photo exported at 300 DPI is still a 500 px photo, just stretched. Second, DPI only affects photos. In EasyCatalog, text, shapes and lines are vector graphics, so they stay sharp at any size.
For product photos, the print quality sets how large a version goes into the PDF. Draft and Standard use photos up to 1,000 px wide. The three 300 DPI qualities use photos up to 1,600 px wide, enough for a photo about 13.5 cm (5.3 in) wide. That is bigger than a product photo in most grids.
So aim for original photos at least 1,600 px wide. If a photo still prints soft, the original is probably small. On Shopify, upload a bigger photo to the product, then click Sync in the editor’s top bar, choose Update product data, keep Images ticked and click Sync selected fields. Then generate the PDF again.
Paper sizes: A4, Letter and A5
EasyCatalog offers three paper sizes, each in portrait or landscape:
- A4 (210 × 297 mm): the standard in Europe and most of the world.
- Letter (8.5 × 11 in, about 216 × 279 mm): the standard in the US and Canada.
- A5 (148 × 210 mm): half of A4. Handy for small booklets and handouts.
Letter is a little wider and shorter than A4, so a page designed for one doesn’t drop neatly onto the other. Pick the size your print shop uses, or the size your buyers will print at home.
You choose the size and orientation in the Start with a template window, when you create the catalog.
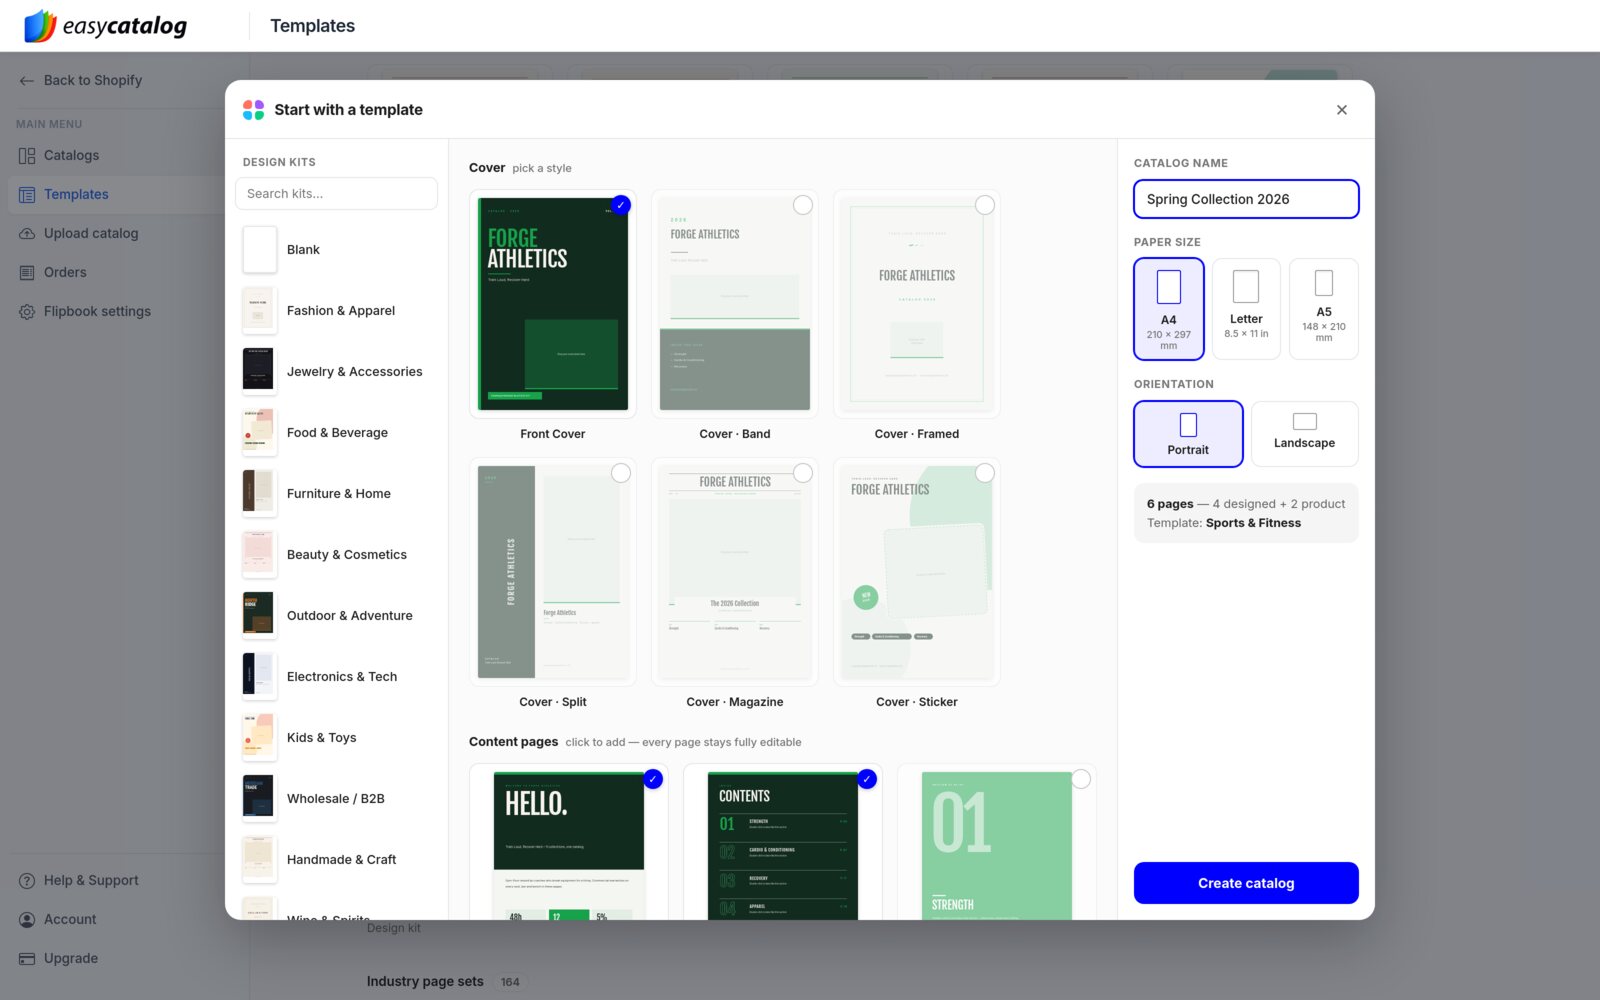
Decide early. The editor can’t change the size or orientation of a catalog that already exists. For another size, create a new catalog, or contact support. There are no custom sizes, so no A3, square or tabloid.
How EasyCatalog exports a print-ready PDF
Everything above comes together in one window of the grid editor: the editor behind New catalog (Advanced editor) on a Shopify store’s Catalogs page, or New catalog without Shopify. The Basic editor has no bleed option. It takes a minute:
- Click Generate PDF catalog in the top bar, and check the Catalog name.
- Under Print quality, pick a 300 DPI option (see the table below).
- Under Bleed (for print shops), pick 3 mm or 5 mm. None is the default and makes only the normal PDF.
- Tick Crop marks if the shop wants them. The box can only be ticked once a bleed is picked.
- Click Generate PDF. Your work is saved, and you land on the Catalogs page while the PDF is made. Keep the editor open until then; after that you can close the tab and the PDF is still made.
- When it’s ready, the catalog’s card shows a Print row under the PDF row, with the file’s link, Copy link and Print file. Send that file to the print shop.
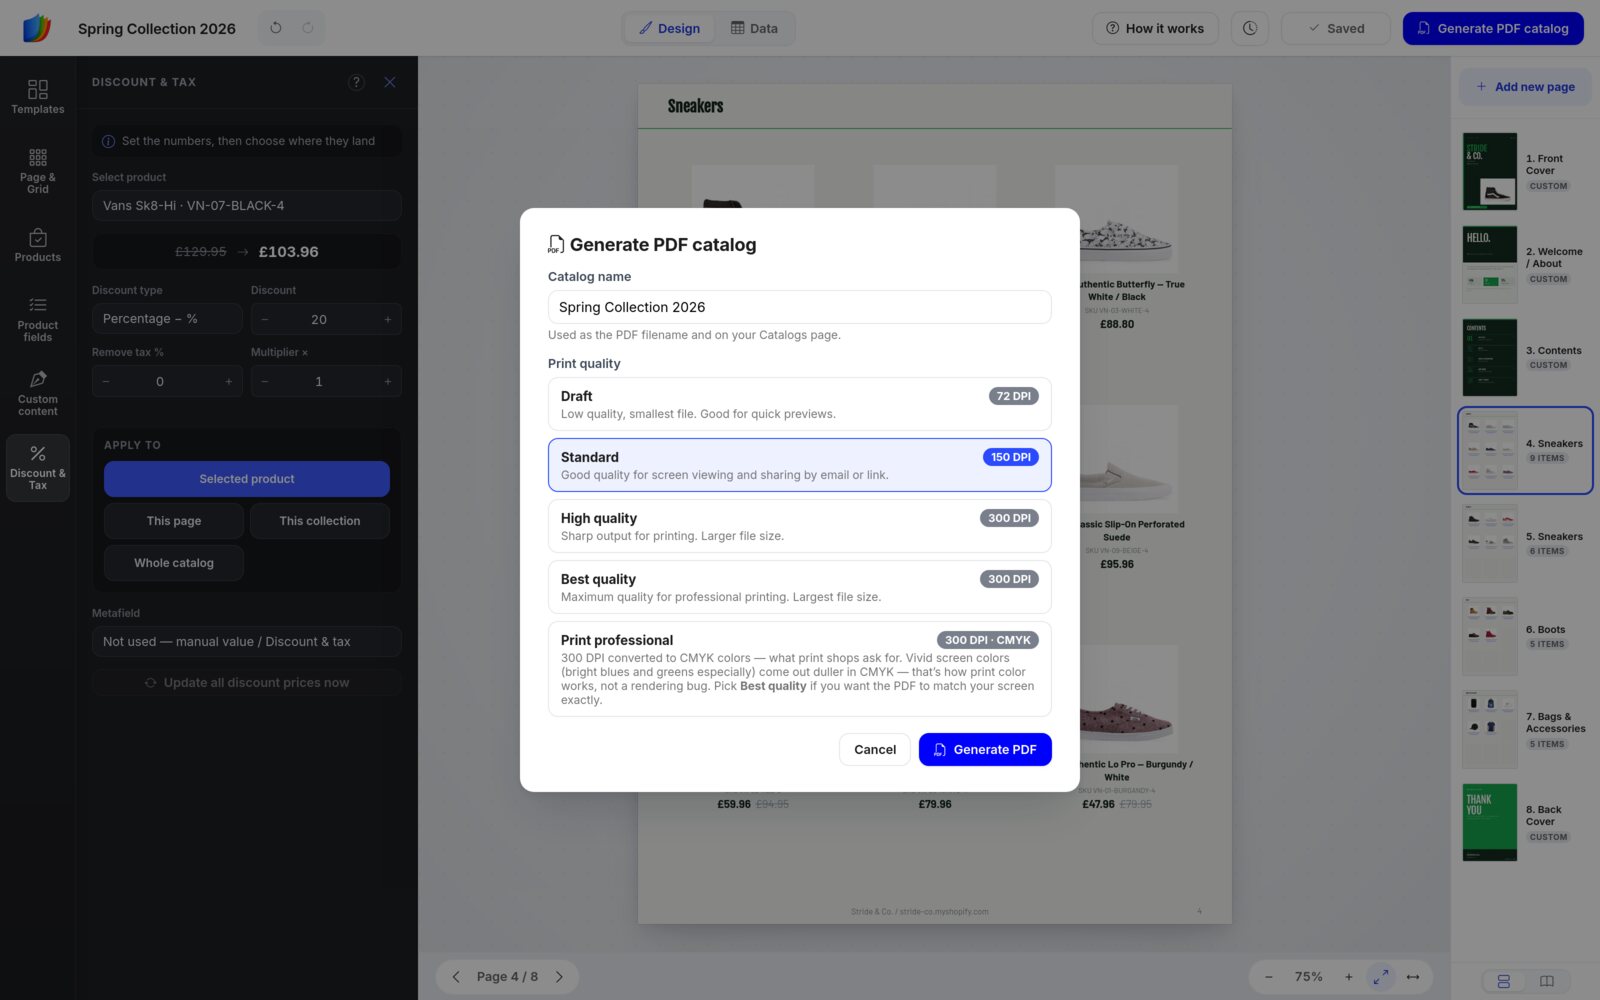
| Print quality | Resolution | Use it for |
|---|---|---|
| Draft | 72 DPI | Quick previews. The smallest file. |
| Standard | 150 DPI | Screens, email and share links. |
| High quality | 300 DPI | Printing. |
| Best quality | 300 DPI | Printing in screen (RGB) colors: an office printer, or a shop that takes RGB. |
| Print professional | 300 DPI · CMYK | Print shops that ask for CMYK. |
What the print file contains
- The same page size. An A4 catalog is still A4 after trimming. The file’s sheet is just bigger: by the bleed on each side, plus 8 mm per side for crop marks. A4 with 3 mm bleed comes out at 216 × 303 mm, or 232 × 319 mm with crop marks.
- Edges extended for you. Page backgrounds, plus header and footer bands, photos, shapes and images that touch the page edge, are stretched into the bleed. You don’t redesign anything.
- Text stays put. Text and rotated elements are never moved or stretched, so keep them inside the safe zone.
- Your share links don’t change. The normal PDF, the flipbooks and every share link stay exactly the page size, without bleed.
- Any quality. Bleed works with every print quality, Print professional included.
Your Bleed and Crop marks choices are remembered in your browser for the next export. To stop making a print file, generate again with None; the old print file is removed. If a print file can’t be made, the card says so in red and the normal PDF is still published. Generate again to retry.
One catalog, two versions. The print quality applies to the whole export, including the normal PDF behind your share links, and each catalog keeps only its newest PDF. For a light PDF online and a CMYK file for print, either download the print file first and then generate again at Standard with Bleed set to None, or use Duplicate on the Catalogs page and generate the copy for print. Changes made after duplicating need to go into both.
Before you send it: a quick checklist
- Replace sample photos. On a Shopify store, Page & Grid shows Replace N sample photos in this catalog while template photos are left. One click swaps them for your product photos.
- Check the edges. On covers and design pages, move text and logos away from the page edge.
- Remove spare pages. A page can’t be hidden from the PDF, so delete the ones you don’t want printed.
- Check facing pages. The book view button at the bottom of the Pages sidebar shows pages as two-page spreads, the way they face each other in print. For a stapled booklet, ask the shop whether the page count must be a multiple of 4.
- Generate after every change. The PDF is a snapshot. Save, then click Generate PDF catalog again.
- Ask for a proof before a large run, especially when color matters.
Stuck on a setting? Click Need help? in the bar under the page to open Fin, the AI assistant. Type your question in your own words, and Fin answers with the steps to follow.
Every option, step by step
The help center covers generating the PDF and bleed and crop marks in detail.
Still deciding between print and digital? Read PDF catalogs vs printed catalogs. New to the editor? Start with the grid editor, step by step.
Make your next catalog print-ready
Build it from your products, then export a 300 DPI PDF with bleed and crop marks for your print shop.